9/30/2021

Basket of Birthday Wishes

The design team for the board this week at Tic Tac Toe Challenge has gone above and beyond in creating some gorgeous cards!  I encourage you to look at their inspiration.


I chose the top row across - scoring , basket, frame.  My scoring isn't decorative; it is the scoring for the fun fold card.  Recipients always seem to really enjoy stand-up cards, so I tend to make these often.

I colored the basket and pie with Copic makers; the background I blended with Distress Oxide inks.  Different coloring mediums require different inks, so I like to use MFT Hybrid ink.  It works with both water and alcohol based inks.

I also did a fair degree of masking on this image.  The basket and apples are two separate stamps and I wanted the background stenciled.  The basket was stamped first, then masked off and the apples were stamped.  I then masked off both to stencil my sky and grass.  This grass stencil from Lawn Fawn is super cool as it has both a stencil and a mask in one (note the mask on the top). 

I hope you will join us at the challenge this week!


Products used:
  • Stamps: The Stamps of Life picnic2stamp, TSOL goodies4wheelbarrow
  • Dies: TSOL Step-Up, MFT Stitched Scalloped Frames
  • Paper/Cardstock: Poppy Parade, Gingham
  • Ink: Distress Oxide Twisted Citron, Tumbled Glass; MFT Hybrid Black Licorice
  • Markers: Copics - Basket E30, E31, E33, E34, E35, E37; Apples R21, R22, R24, R27, Y13; Pie E50,E51, E53, E55, C00, C0, C1, C2 
  • Stencils: Lawn Fawn Grassy Stencil, MFT Mini Cloud Edges

Thanks for visiting today!  Follow me on Instagram, Pinterest, Facebook and Bloglovin'

post signature

9/28/2021

Expressions in Ink Cards

If you follow me you will know I am not one for patterned paper.  By that, I mean making it the focal point of the card.  I use it but in small quantities or as a background.  However, this is one paper where I LOVE it.  All the patterns are gorgeous.  Usually there are patterns within a pack that I don't care for.  Not with this one.  So I felt it perfect as a focal point for this week's sketch at CAS Colours & Sketches.


The card was simple to create but it took a bit of measuring.  If you're not so inclined (I know some people hate measuring) then this probably isn't the card for you.  My rectangle measures 3 1/4 x 1 1/2 inches.  Each of the squares is 1 1/2 inches.  Then I cut a rectangle and two squares 1/8 inches larger out of gold foil to give just a sliver of a border.  I placed the rectangle 1/2 inches from the top and centered (which is slightly less than 1/2 inches from each side.)  Easy to align everything from there.

Once I had the correct measurements it was simple to create another card so I also made one for a birthday.  For the shadowed sentiments I chose coordinating colors and gold foil.  I  also used self-adhesive sheets on the back of the foil so I wouldn't have to worry about glue smooshing out and ruining the foil.

Products used:
  • Dies: Cottage Cutz Thanks w/Shadow, Celebrate w/Shadow
  • Paper: Stampin' Up! Expressions in Ink, Gold Foil, Shaded Spruce, Polished Pink

Thanks for visiting today!  Follow me on Instagram, Pinterest, Facebook and Bloglovin'


post signature

9/27/2021

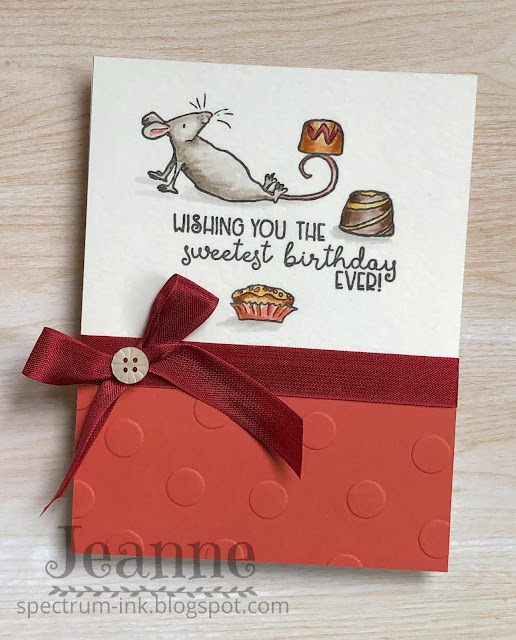
Sweet Birthday with Colorado Craft Company

I rarely receive a stamp and use it within days of getting it, but I did here.  I absolutely LOVE the Anita Jeram stamps from Colorado Craft Company.  This set was part of Stamptember at Simon Says Stamp.  I thought it perfect for Barbara's color challenge this week at Splitcoaststampers.

Her colors are So Saffron, Terracotta Tile, and Cherry Cobbler with "dessert" for dessert.  I realized after I made this that candies may not qualify as dessert but oh well, too late now!  I think I gained a pound after eating my "inspiration" while making this card.  

I used plenty of neutrals in my card to color the mouse and chocolate.  I took the layout for the stamps from one of the samples on SSS but the balance of the layout is mine.  I wanted to emboss the bottom panel and this large dot seemed to coordinate well with the chocolate theme.  I considered doing swirl embossing. In retrospect I think it would have been a bit better, but not enough to remake the card.  Next time!

The coloring here uses the ink pads/reinkers and blender pens.  I wanted a looser look in keeping with Jeram's style.

Products used:
  • Stamps: Colorado Craft Company Life Happens (Simon Says Stamp Stamptember collaboration)
  • Ink: Stampin’ Up! Cherry Cobbler, So Saffron, Terracotta Tile, Chocolate Chip, Cinnamon Cider, Grey Granite, Smoky Slate; MFT Hybrid
  • Paper: Strathmore Mixed Media, Terracotta Tile
  • Accessories: Cherry Cobbler Ribbon, Polka Dot Basics Embossing Folder

Thanks for visiting today!  Follow me on Instagram, Pinterest, Facebook and Bloglovin'

post signature

9/17/2021

New Home Card

Happy Friday!  I have a card that would be perfect for welcoming a new neighbor or giving to a friend who just purchased a home.  It features the Home Sweet Home stamps and dies from Lil' Bluebird Designs.

This card is one that looks more complicated than it is.  By doing some smart die cutting it actually goes quite smoothly.  I'm a bit pressed for time tonight, but complete instructions to create the card including marker colors are on the Cottage Cutz blog!

Products used:

  • Stamps/dies: Lil' Bluebird Designs Home Sweet Home
  • Dies:  Cottage Cutz, Circle Windows Slimline, Hills Slimline, Nested Rectangles Slimline
  • Paper: SU Subtles and Brights DSP

Thanks for visiting today!  Follow me on Instagram, Pinterest, Facebook and Bloglovin'

 
post signature

9/16/2021

Trick or Treat Mummy

I can't believe we're half way through September!  It seems so early for Halloween cards, but it really is not.  Today I have a card for the Tic Tac Toe Challenge where I also happen to be the board designer this week.  I hope you will find the time to join us.

I picked the top row across - ribbon, costume, beige/brown.

I actually had planned to do a different row but as I was looking through my stamps I couldn't resist this cute mummy.  I thought the ribbon would be fun with the mummy but I wasn't sure how to incorporate it. I decided to wrap a panel that would be behind the image.

I didn't want a straight panel so I just cut a random shape from Crumb Cake cardstock.  Wrapping it was a bit tricky because of the angle; the ribbon did not want to lay flat.  I used tape on the back to smooth out any wrinkles. After I had wrapped the panel I distressed the edges (I probably should have done this first!) and used ink to shade them and the ribbon.

Thanks for stopping by today!  Please join in the fun - I love seeing your cards!

Products used:

  • Stamps/dies: The Stamps of Life HalloweenKidsHSN (this set is on HSN; there is a similar set with a mummy on the TSOL website)
  • Paper/Cardstock: Crumb Cake, SU Magic in this Night DSP (retired)
  • Ink: Crumb Cake
  • Ribbon: SU Forever Greenery (retired)
  • Markers: Copics - E40, E41, E42, E49, E50, E51, E53, E55, Y13, Y18, Y26

Thanks for visiting today!  Follow me on Instagram, Pinterest, Facebook and Bloglovin'

post signature

9/10/2021

Thanks A Latte and Making a Patterned Background

Happy Friday!  Today I have a thank you card for the coffee lover in your life.  In my case the biggest coffee lovers I know are ME and my husband!  I drink it all day long and even have an espresso machine. Naturally I love the new Coffee Time stamps and dies from Lil' Bluebird Designs.

For this card I created my own patterned paper by stamping some of the images at random on a piece of 4 1/4 x 5 1/2 inch Crumb Cake cardstock.  I say random, but it wasn't completely.  I knew I was going to highlight one of the coffee cups so I needed to make sure at least one was off  center and did not overlap the edge.  To fill in the space between the cups I used the coffee beans.

I chose red to add a pop of color to the card.  I colored one coffee cup using Prismacolors and then die cut the Thanks w/Shadow sentiment in coordinating colors.  I used Soft Suede, a brown that is slightly darker than the Crumb Cake and Real Red.

For as simple as this image is, I sure used a lot of reds.  But that what gives the cup it's nice shading.

I stamped the sentiment Thanks A Latte slightly off center on my card using black ink.  I wanted to make sure it stood out from the background.

Then I added my sentiment with shadow on top.  This makes a strong focal point and covers the top line of stamping nicely.  I had originally planned to mask off the sentiment but this works just as well and is easier!


Finally I popped up my coffee cup using foam dots.

This card can be made in any color and would also look great on white with pastel colored images stamped in the background.

Products used:

  • Stamps and Dies: Lil' Bluebird Designs Coffee Time
  • Dies: Cottage Cutz Thanks w/Shadow
  • Cardstock: Crumb Cake, Real Red, Soft Suede
  • Ink: Crumb Cake, Black
  • Prismacolor pencils: PC922, PC923, PC924, PC925, PC1078, PC947, PC938

Thanks for visiting today!  Follow me on Instagram, Pinterest, Facebook and Bloglovin'

post signature

9/09/2021

Galactic Background Birthday Card

I sure hope my daughter doesn't see this post.  This is her birthday card and I haven't given it to her yet.  I'm pretty sure no one in my family follows my blog, so I feel pretty safe to post it.


My daughter loves Star Wars and would like to build a droid the next time she heads off to Disneyland.  She has asked for that for her birthday. So....Kindred Stamps makes the perfect stamps for that!

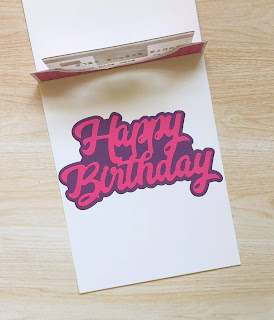
This is actually a gift card holder.  I'll make a small gift card for the droid to put on the inside.

I created the background by blending several Distress Oxide inks going from the pink in the center to the black around the edges.  I'll list them below in the order used inside to outside.

Then I used plain water and a paint brush to sprinkle on a few drops.  This lightens the Oxides. The last step was to flick on white paint (I actually used gesso as I did not have any paint) to add brighter stars.  I've made backgrounds like this before.  They are a bit time intensive but well worth the effort!

For my planet, I started with a Crumb Cake cardstock and again used Distress Oxide inks to blend.  I wasn't super concerned about this being even as I wanted a "rocky" surface.  I used the brown reinkers to flick on some "pebbles."

My droids are colored using Copic markers and fussy cut out.  I don't know why, I have a Scan 'n Cut, but I thought I'd do it by hand this time.  I made sure to use a marker to color between the gold droid's arms and body so it would blend with the background.  He got popped up with foam dots while the other two are glued to the card.

Products used:

  • Stamps: Kindred Stamps Galactic Adventures the Sequel
  • Dies: The Stamps of Life Happy Birthday, A2 Gift Card Pop-Up Die Set
  • Distress Oxides: Background - Picked Raspberry, Wilted Violet, Blueprint Sketch, Chipped Sapphire, Black Soot; Planet - Antique Linen, Frayed Burlap, Brushed Corduroy
  • Copic Markers: N0, N1, N2, Y13, Y18, Y26, RV06, B18, YR15, YR18,

Thanks for visiting today!

post signature

9/08/2021

Rosh Hashana Card

I was invited to spend Monday evening with friends and celebrate Rosh Hashana with them.  My friend is an excellent cook and we had quite the feast!  We have done this for several years and I always make her a card.  It can be quite the adventure trying to find stamps for Jewish holidays, so I get creative with the images.  Since apples and honey are traditional for Rosh Hashana I often use those images.


This card was inspired by one I saw on Facebook by
Karen Ann Rees Freiberg in the Stamps of Life Fan page.  It uses the Apple Fold-It and circle dies to create the apple slices.

I drew in the seeds and then colored the honey with a Copic marker.  To give them shine I covered the honey in Crystal Effects (Glossy Accents).  I had a sentiment set from CAS-ual Fridays that I used for the banner and inside.  It says "Wishing you peace, happiness and prosperity."

Products used:

  • Stamps: CAS-ual Fridays Shalom
  • Dies: The Stamps of Life Apple Fold-It
  • Cardstock: Cherry Cobbler, Real Read, Early Espresso, Wild Wasabi, Garden Green, Very Vanilla
  • Markers: Copic Y26

Thanks for visiting today!  Follow me on Instagram, Pinterest, Facebook and Bloglovin'

post signature

9/07/2021

Clean and Simple Color Challenge

This week's color challenge at CAS Colours & Sketches give us a new hostess for the month (Jenny) and new colors!  They are Soft Succulent, Evening Evergreen and Polished Pink.  Two lovely soft blue/greens and a bright pop of pink.

I made two of these card because I messed up the first one!  The second I made first but when I went to cut out the panel for the inset I realized that it looked off center and the vase was just too high.  It looked fine on the plain card though.

This card was super fast to create; there is very little shading in the coloring so making another that was how I has envisioned it wasn't a problem.  I used three panels of the Soft Succulent under the scalloped panel to raise it and give just a hint of color.


Products used:

  • Stamps: The Stamps of Life Flowers2share
  • Dies: The Stamps of Life Scallpoed Rectangles
  • Cardstock: Basic White, Soft Succulent
  • Markers: Stampin' Blends - Polished Pink, Soft Succulent, Evening Evergreen; Copics - N0, N1

Thanks for visiting today!  Follow me on Instagram, Pinterest, Facebook and Bloglovin'

post signature

9/06/2021

Color Challenge Sunflower

It's my pleasure to be the hostess this week at the Splitcoaststampers Color Challenge.  Even though I'm never completely ready for summer to end, I decided to go with fall colors this week.  I think it may be that I have a new stamp and die set (the Hello Sunflowers Class from the Stamps of Life) and some patterned paper that seemed made for it.  I guess I really wanted to use them.

The colors I picked are: Pumpkin Pie, Crushed Curry, Balmy Blue and Early Espresso with the theme of Fall as an option.   

I had planned on coloring the flowers but when I began playing with the dies I realized that they are beautiful alone and I could give them dimension with some ink blending.  I used the same color ink to shade the edge and also the center of the flowers before adhering the brown center portion.

I had also planned on stenciling a sky and using the paper as just a small accent.  What was in my mind is NOTHING like what you see here.  Oh well, maybe one day I will make THAT card.  For now I have this one and I'm happy with how it turned out.

I hope you'll join us at the challenge this week.

Products used:

  • Dies: The Stamps of Life Hello Sunflower Class, Floral Swish Card Die Set
  • Paper/cardstock: Early Espresso Balmy Blue, Pumpkin Pie, Crushed Curry, Pink & Main Pumpkin Spice
  • Ink: Pumpkin Pie, Crushed Curry
  • Accessories: Crushed Curry Ribbon, Enamel Dot

Thanks for visiting today!  Follow me on Instagram, Pinterest, Facebook and Bloglovin'

post signature

Bugs and Kisses

Happy Labor Day!  I have a full week of posts for you this week.  I had several occasions for cards this week and have been quite busy that last two days making them!  To start I have this thinking of you card featuring one of the new stamp sets from Lil' Bluebird Designs.

That little frog is just too cute!  I suppose he is the kisses in the "Bugs and Kisses".  I made this card using the September 1 sketch at Splitcoaststampers.  I was a Guest Designer for this challenge earlier in the year and one thing I discovered - having a sketch makes designing a card go much faster!

I picked my paper first so I would know what colors to use.  I just needed to include a green for my frog.  I colored the images with Prismacolors (listed below).  These images are fairly small so I thought the pencils would be easier than markers and they were.  The pencils allowed me to give shading in the tiny spaces.

That's my card for now.  I'll have another one for you this evening!

Products used:

  • Stamps and Dies: Lil' Bluebird Designs Love Bugs
  • Dies: Cottage Cutz Stitched Circles, Stitched Scalloped Squares
  • Paper: Queen & Co Fruit Stand, Daffodil Delight, Garden Green
  • Prismacolor Pencils: PC915, PC916, PC921, PC1005, PC911, PC989, PC903, PC919

Thanks for visiting today!  Follow me on Instagram, Pinterest, Facebook and Bloglovin'

post signature

9/02/2021

Big Hugs Candy Corn Card

I'm having fun with Fold-its dies and the Tic Tac Toe Challenge.  The last few weeks it seems that there is an element just made for one of these shaped cards.


 Here is the board:
I chose the middle row across - Candy Corn, Orange, Plaid.

I love being able to pick my challenge and I often use more than the three elements in my chosen line.  This is one of the few time that I think I stuck to just my chosen elements!

I hope you'll play along with us this week.  It's a great way to start on your fall cards!

Products used:

  • Dies: The Stamps of Life Candy Corn Fold-it, TSOL Big Hugs
  • Cardstock / Paper: Pumpkin Pie, Mango Melody, Basic White, TSOL Sunshine, So Cool paper
  • Accessories: TSOL enamel dots and ribbon

Thanks for visiting today!  Follow me on Instagram, Pinterest, Facebook and Bloglovin'

post signature