4/30/2019

Two Challenge Tuesday

I find it really amazing that when there are two color challenges on the same day on two different websites with two different hostesses they will pick very similar colors.  This week at CAS Colours & Sketches the colors are Peek-A-Boo Peach, Soft Sky and Strawberry Slush.  (It's also the fifth Tuesday in April so it's a double challenge with a sketch.)
 The challenge:
I had actually created the cloudy sky last week for something else then realized I had done it in the wrong orientation and it wasn't wide enough.  I kept the panel and it turns out it was perfect for this sketch.

I die cut the butterfly in white and colored it with the ink using sponge daubers.  I like doing this when I want to have some shading on die cuts.  I colored the body with Smoky Slate - I thought black was a bit too dark for the rest of the colors.  Then I went over it with Wink of Stella.  Finally, I chose a sentiment that was generic enough to allow me to finish the inside of the card for one of many purposes - birthday, thank you, Mother's Day.  I'm trying to actually USE more of the cards that I make.  Birthdays and thank yous are my two biggest reasons to make cards.
My next card is for Splitcoaststampers Color Challenge.  Barbara chose Calypso Coral, Peek-A-Boo Peach and Old Olive.  Colors just made for a floral card.  I have a friend who is going through some rough times right now and this sentiment is one of my all-time favorites for saying "thinking of you".  It says more than just that but is not too sappy.  It says exactly what I want to say - hugs and love.  This set has several great sentiments and is retiring at the end of May.
I used Stampin' Write markers in peach and coral on an acrylic block and blender pens to color the floral image.  Then I used the "water color wash" stamp for the wash in the background.  I usually like to create my own background, but since it was going to be mostly covered up I used the stamp.  I tapped the stamp on the peach ink pad and then used a sponge dauber to add the coral to the edges.
I added a die cut leaf spray and some baker's twine behind the popped up floral panel.  This die set is one of my favorite dies and is also retiring at the end of May.  So sorry to see these stamps and die go, but I will keep them to use for quite awhile.

Card 1
Stamps: MFT Essential Sentiments
Dies: Cottage Cutz Butterflies, Cottage Cutz Stitched Ovals, Ellen Hutson Stitched Edges

Card 2
Stamps: Stampin' Up! Love What You Do, sentiment - Stampin' Up!Ribbon of Courage (retiring)
Die: Stampin' Up! Petals and More (retiring)

Inks and markers: Stampin' Up!

Thanks for visiting today!  Click here to sign up for email notifications of future posts (you will be sent an email to verify your address - don't forget this step).  Follow me on Instagram, Pinterest, Facebook and Bloglovin'.


post signature

4/26/2019

I Believe in You

Happy Friday!  Today I have a card of encouragement.  Unicorns are so much fun to use since they lend themselves to all manner of sentiments but especially ones with a "believe" theme.
For this card I also used a sketch I found on Splitcoaststampers.  Sketches make creating a card easier in many respects since many of the design decisions are already made!  For this sketch I rotated and flipped it.
All the pieces were cut from white card stock and colored using Distress Oxide inks.

For my sky panel, I used a stencil and DO ink in a light blue to create clouds on a piece of white card stock and then cut out a stitched rectangle using the largest of the Cottage Cutz Stitched Rectangle dies.
This allowed my clouds to go easily went over the edge of my panel for a seamless look.
When all was assembled, my final step was to add Wink of Stella to the mane, horn, wing and tail and then add some sequins for more sparkle.  When making a card with unicorns, you really can't have TOO much sparkle!

Dies: Cottage Cutz Flying Unicorn, Rainbow with Clouds, Stitched Rectangles, Nested Stitched Scallop Rectangles
Stamps: Stamping Bella Unicorn Sentiment
Accessories: Wink of Stella, sequins

Thanks for visiting today!  Click here to sign up for email notifications of future posts (you will be sent an email to verify your address - don't forget this step).  Follow me on Instagram, Pinterest, Facebook and Bloglovin'.


post signature

4/23/2019

Two Challenge Tuesday

Hi everyone!  My card today does double duty for the CAS Colours & Sketches sketch challenge and also for Splitcoast Stampers color challenge. 

Here is the posted sketch:
https://cascoloursandsketches.blogspot.com/2019/04/challenge-318-sketch.html
And the colors are Balmy Blue, Coastal Cabana and Tranquil Tide.

I'm not sure why, but I really struggled with this card.  I think it was a confluence of several things.  I was super busy this weekend (I was in charge of a neighborhood Easter egg hunt and brunch for 130 people and I was the one in the bunny suit!) and I couldn't quite get the colors and sketch to come together.  Ultimately it probably would have taken less time to do two cards!

As I've said before, clean and simple cards are rarely simple.  This one was no exception as I knew that the stamping better not be off or sloppy - no way to cover that up.  So, there were a couple of mis-stamped versions.  I think this design would work better with colors that have more contrast and I may do another in different colors.  And I may do another card for the color challenge that showcases the colors a bit more.  Perhaps to show myself that, yes, this is a wonderful design and, yes, the colors can look beautiful together.  I'll be sure to link to that post if I do!

Below are the products I've used for this card.  If you don't have a Stampin' Up! demo and live in the US I'd appreciate if you would shop with me.

Stamps: Stampin' Up Varied Vases, (also available as a bundle), Stampin' Up! Swirly Frames
Accessories: Stampin' Up! Vases Builder Punch, Washi tape
Inks: Stampin' Up! Tranquil Tide, Coastal Cabana, Balmy Blue

Thanks for visiting today!  Click here to sign up for email notifications of future posts (you will be sent an email to verify your address - don't forget this step).  Follow me on Instagram, Pinterest, Facebook and Bloglovin'.

post signature

4/19/2019

Magical Card-in-a-Box

Happy Friday!  Today's card is a 3-D card-in-a-box.  I love these kind of cards. They are so special to make and give.  Finding the pieces to fit in the box is a lot of fun and can really make you think creatively.
This card features dies from Cottage Cutz' Magical Fantasy release.  Playing with the Princess die brought  back memories of playing with paper dolls when I was little.  The die has three different dresses, three hairstyles, a cape and accessories.  Hard to choose what to do!
 
To start the card I used a brick stencil and Distress Oxide Hickory Smoke ink on gray card stock to pattern it so it looked like stone.  I did not use a die to cut the box since this has special dimensions.  It still folds flat to A2 size but the flaps are a bit longer than normal (and the bottom portion a bit shorter) because I needed to accommodate the height of  the Princess.  After the box was made it was just a matter of filling it.
I used a window die and stenciled some clouds behind it then added the trellis with flowers.  I found a little bunny that I had cut last year but never used and decided he was the perfect size for the scene.  I love it when I find unexpected uses for items I've stashed.
It's hard to see in this photo but the unicorn's mane, tail and horn are covered in Wink of Stella.  The bluebirds are actually cut from an Easter die set and are chicks, but I colored them as bluebirds instead.  One is adhered to the back using a foam dot and the other is "flying" on a strip of acetate.

The word Magical is cut from a holographic foil card stock that changes color depending on the angle.  I used iridescent sequins that also change color and add a lot of sparkle!

I hope you like my special card today - I was so excited to make it.  I love 3-D and interactive cards!  They allow for so much creativity.  And this one was no exception.

I hope you all have a wonderful Easter weekend! I'll be the Easter bunny at my neighborhood party - always a fun time!

Dies: All Cottage Cutz - Princess Dress-Up, Sweet Unicorns, Magical Unicorn Dreams, Spring Window w/Vines, Spring Grass, Easter Bunny & Chicks, Somebunny Loves You
Distress Oxide Inks: Shaded Lilac, Shabby Shutters, Worn Lipstick, Mowed Lawn, Abandoned Coral, Antique Linen, Pumice Stone, Tumbled Glass, Picked Raspberry, Scattered Straw, Rusty Hinge, Vintage Photo, Bundle Sage, Walnut Stain, Tattered Rose Hickory Smoke

Thanks for visiting today!  Click here to sign up for email notifications of future posts (you will be sent an email to verify your address - don't forget this step).  Follow me on Instagram, Pinterest, Facebook and Bloglovin'.

post signature

4/16/2019

Two Challenge Tuesday a Little Late

I'm posting a bit late today but I am making it on Tuesday so I hope that counts for something.  Lot's of things going on right now so I'm a bit tardy with this post.  I did have my cards finished this weekend just no time to photograph or write up a post.

My first card is for CAS Colours & Sketches.  Wei picked some fun, primary colors this week!  The blue is actually brighter than shown here.  It looks navy here but it is not.  Much brighter in person - more like the little guy's pants!
I've had this stamp about a year now and never used it but I thought these colors - Real Red, Blueberry Bushel and Crushed Curry were perfect for the image.  I played with making the umbrella a solid color but that was too much color, so I paper pieced a patterned paper.  Finding one small enough and in the right color to look appropriate was a challenge in and of itself but I managed to dig up some old Valentine's themed paper.  Stamped, shaded and fussy cut out - and it worked!
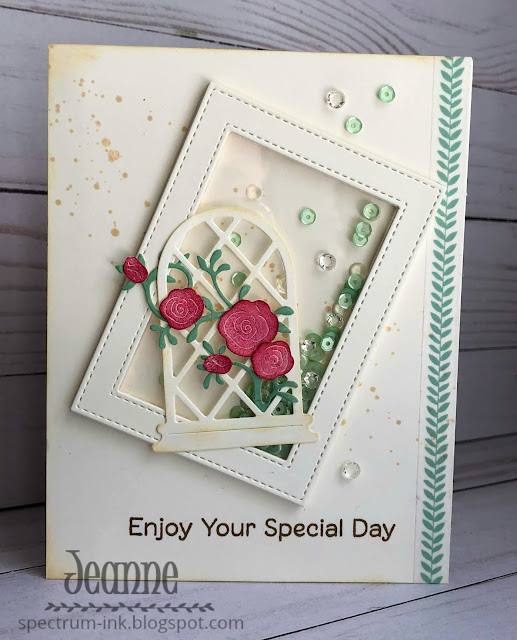
My next card is for the color challenge at Splitcoast Stampers - Very Vanilla, Lovely Lipstick and Mint Macaron with dessert being Roses.  This obviously called for something very different than the first card.  I have a friend whose birthday is April 15 so I decided to make a shaker card for her.
She always loves my cards and if there are "bells and whistles" so much the better!  The shaker is made by stacking the die cut frames instead of using foam.  This keeps the shaker elements from sticking.  It doesn't work for every shaker card but it did for this one.
I also used a trick I learned from watching Jennifer McGuire.  I glued a few of the sequins and rhinestones to the back of the shaker portion.  This way the  elements don't all fall to the bottom.  Some get caught and they shake a bit more evenly.

Stamps and dies card 1: MFT Puddle Jumper and Rain or Shine
Dies card 2: Cottage Cutz Spring Window w/Vine, Little Princess and Roses, Stitched Wide Rectangle Frames

Thanks for visiting today!  Click here to sign up for email notifications of future posts (you will be sent an email to verify your address - don't forget this step).  Follow me on Instagram, Pinterest, Facebook and Bloglovin'.

post signature

4/12/2019

Bunny Medallion - Using Stacked Die Cuts

Happy Friday!  Today's card is easy to create and is perfect for a last minute card.  I love this little bunny die - it reminds me of the adorable cottontails that are in my yard right now! (And eating my grass I might add. LOL)
 It also uses a technique that I like which gives subtle color and added dimension - stacking dies cuts.

I started by cutting three ovals in purple and one in white, stacking and gluing them all together with the white on top.  Next I cut three of the Spring Egg Scene bunnies in white and stacked those together.  I glued this to the top of the ovals to create a medallion.
I find this technique gives just a hint of color around the edges and mimics the look of an embossed design.  It is prefect for dies such as this silhouetted bunny.

In order to create a bit more interest and give just a little more color  to the card, I used a splatter stamp behind the medallion along with some silver thread, white foliage and sequins.
This technique gives a very clean and simple look, which is one of my favorite styles!

Dies: All Cottage Cutz - Spring Egg Scene, Spring Teacup Bouquet, Stitched Ovals, Blessing Phrase

Thanks for visiting today!  Click here to sign up for email notifications of future posts (you will be sent an email to verify your address - don't forget this step).  Follow me on Instagram, Pinterest, Facebook and Bloglovin'.


post signature

4/09/2019

Another Two Challenge Tuesday

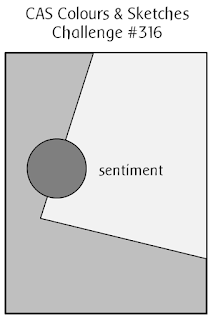
Hi everyone - I've got two challenges today but only one card!  CAS Colour & Sketches has a sketch challenge and I'm the hostess for Splitcoast Stampers color challenge.  I've been pretty busy trying to get taxes finished and I'm heading out for On-stage in San Antonio on Friday.  So one card doing double duty was almost a necessity!
Here is the sketch:
https://cascoloursandsketches.blogspot.com/2019/04/challenge-316-sketch.html
The colors are Grapefruit Grove, Daffodil Delight and one of my personal favorites, Berry Burst.  Since this 2017-2019 In-Color will be retiring this year I had to use it one more time!

The card is fairly straightforward to create.  I stacked the die cuts so that I have a "shadow" of Grapefruit Grove under the word thanks.  To get the angled panel I simply die cut a stitched rectangle, placed it on my card at the angle and then trimmed off the excess.

The butterfly looks a little washed out because my Wink of Stella sort of blobbed on it.  I spread it around but it's pretty thick.  Makes for a lot of sparkle in person but not good for photos - sorry!
This butterfly set is one that has been extremely popular with Stampin' Up! and now that I've used it I can see why.  It's easy to create some lovely cards with it!

Stamps/punch:  Butterfly Gala
Stamps (background): Beauty Abounds (also available as a stamp/die bundle)
Ink: Grapefruit Grove, Daffodil Delight, Berry Burst
Accessories: Rhinestones, silver thread, Frosted flowers embellishments, stitched rectangles dies, simple stripes embossing folder

Thanks for visiting today!  Click here to sign up for email notifications of future posts (you will be sent an email to verify your address - don't forget this step).  Follow me on Instagram, Pinterest, Facebook and Bloglovin'.

post signature

4/06/2019

Humor Me

I normally don't post over the weekend but I just had today.  The clean and simple challenge this week at Splitcoast Stampers was to use humor on your card.  I have so many humor themed stamps that I've never used it's embarrassing.  In fact, I think I'm a collector of humorous stamps as opposed to being an actual user of humorous stamps.  So I thought I'd make a few cards.
This was my first card and pretty much sums up my relationship with our eight legged friends!  It didn't take long to create but is one of those cards where I had to make sure everything was lined up perfectly and absolutely clean or it would look bad.  The more clean and simple the card the more it had better be perfect!  No room for embellishment opportunities here.
I have several images that could have been used with this sentiment but thought this little bunny looked pretty silly in his cup and definitely like a rather benign ruler.
Finally this card uses two wooden stamps that were some of my first purchases in cardmaking and yet they have never seen ink!  I think with wooden stamps the need for stamping multiple times to get a really clean image was intimidating.  Now with stamping platforms that isn't the case.  So both these stamps (image and sentiment) spent a few seconds in the microwave and I unmounted them to use as cling stamps.  I colored "Helen" with Copics and added some washi tape for interest.

I hope you enjoyed these cards.  I'll be creating more in the future.  I have a lot of fun finding just the right image for sentiments like these!

Stamps: Judi-Kins Harold the Spider, Funny Bones by Riley, Inkainkado Caffeine, Inky Antics Helen, Inky Antics Be Somebody
Dies:  Cottage Cutz Teacup Bunny,  MFT Inside Out Stitched Circles

Thanks for visiting today!  Click here to sign up for email notifications of future posts (you will be sent an email to verify your address - don't forget this step).  Follow me on Instagram, Pinterest, Facebook and Bloglovin'.

post signature

4/05/2019

He is Risen Easter Card

Happy Friday - are you ready for the weekend?  I am (although I think we'll be doing our taxes this weekend so it may not be super fun).  Today's card uses two new cross dies from Cottage Cutz.
I love the font on this sentiment die; I think it makes quite a statement as a focal point.

For this card I used various colors of cardstock.  At times with die cut cards I will use white and then color the pieces with either Copic markers or Distress Oxide inks.  For this I only colored the flowers centers with Copic markers.
Although my color choices are pretty tradional Easter colors, I did use the specific colors for this week's color challenge at Splitcoast Stampers - Gorgeous Grape, Highland Heather and Pear Pizzazz.

Dies: Cottage Cutz Cross with Spring Lilies and He is Risen Cross
Card Stock: Gorgeous Grape, Highland Heather, Pear Pizzazz, white and metallic gold foil

Thanks for visiting today!  Click here to sign up for email notifications of future posts (you will be sent an email to verify your address - don't forget this step).  Follow me on Instagram, Pinterest, Facebook and Bloglovin'.


post signature

4/02/2019

Color Challenge Tuesday

I'm on two challenge design teams and it is amazing to me that when there is a color challenge for both, the hostesses will pick very similar colors.  I suppose that there is some logical reason, like it's spring, so of course the colors chosen will reflect that.  But of all the colors to choose from...this week purple and green seem to be the ones!
This is for CAS Colours & Sketches.  Grapefruit Grove, Gorgeous Grape and Granny Apple Green
These colors (orange, purple and green) are my favorites for Halloween, so I really had to resist making a Halloween card.  I chose this retired Stampin' Up! bunny and decided to give him a new twist.  I masked him and used two stamps, then I was able to cut out the image with my Scan 'n Cut.  I love being able to do that.
I had so much fun that I made two cards.
I used markers on acrylic blocks and a blender pen to "watercolor" my images.  And interestingly the Scan 'n Cut did not register both images the same.  It cut between the bunny's nose and the bird on one but not the other.
My next card is for the color challenge at Splitcoast Stampers this week.  Gorgeous Grape, Pear Pizzazz and Highland Heather.
This is one of those cards that looks complicated but is not.  I used adhesive backed sheets on the back of the colored cardstock then ran them through the Big Shot with the bunny die.  It cut through the cardstock but not the backing sheet.  So all my little intricate pieces had adhesive on the back and were still stuck to the backing paper.  I ran the die through on white and glued the cut piece to a solid white panel.  From there it was just lifting off the colored cardstock and placing it in the appropriate hole.  It went much faster and was simpler than I had anticipated.

Stamps: Stampin' Up! Everybunny
Dies:  Simon Says Stamp Filigree Bunny, MFT Stitched Rectangles and Stitched Scallop Squares.

Thanks for visiting today!  Click here to sign up for email notifications of future posts (you will be sent an email to verify your address - don't forget this step).  Follow me on Instagram, Pinterest, Facebook and Bloglovin'.


post signature