12/20/2019

Fox All Occasion Card

Happy Friday!  My card today uses dies from a new release at Cottage Cutz.  This little fox makes a great card for any age and any gender.  The sentiment leaves it open to being for any occasion.  I left the inside blank and will fill in when I use the card.
I cut the pieces from white cardstock and colored using Distress Oxide inks.
This is a super easy card with the two circles highlighting the main image.  I used a retired Cottage Cutz die for the  small foliage, but any die with small foliage will work.

After assembling the card, I finished by using some Stickles on the "berries".

Dies: Cottage Cutz Arctic Foxes and Snowy Arctic Trees
Stamps: Technique Tuesday Frederick & Fiona (I believe this is retired)
Distress Oxide Inks:  see photo

Thanks for visiting today! Click here to sign up for email notifications of future posts (you will be sent an email to verify your address - don't forget this step).  Follow me on Instagram, Pinterest, Facebook and Bloglovin'.


post signature

12/10/2019

Two Challenge Tuesday

I've been gone for the past week so today's cards we made quickly - something which many people appreciate at this hectic time of year.  The first card is for the color challenge at CAS Colours & Sketches.  We were challenged to take any challenge from 2019 and turn it into a seasonal card.  A sketch challenge would have been simple but I like trying unconventional colors for seasonal cards.
The colors I picked were from challenge 328 on July 2, 2019 - Flirty Flamingo, Petal Pink and Soft Sea Foam.  The bear in this set just seemed joyful to me and working with a polar bear image makes coloring go rather quickly (all  you need are shadows!)  The sky is a Petal Pink patterned paper and the scarf and trees are colored with Flirty Flamingo and Soft Sea Foam Stampin' Blends.

My second card is for the color challenge at Splitcoaststampers this week where I am the hostess.  I had every good intention of doing an intricately colored card but life just got in the way.  So I decided on die cuts which I colored with the ink and sponge daubers.  I think it came out nicely although it was not at all what I had planned.  That is what I like about die cuts - they add so much but don't necessarily take a lot of time!
I hope you will be able to join us this week for one or both of the challenges!

Card 1
Stamps: My Favorite Things Merry Moments
Dies: MFT Inside Out Stitched Circles

Card 2
Stamps: Concord & 9th Winter Wear
Dies: Cottage Cutz Warm & Cozy Cocoa, Scalloped Circles
Accessories: Stampin' Up! Winter Knit Embossing Folder

Thanks for visiting today! Click here to sign up for email notifications of future posts (you will be sent an email to verify your address - don't forget this step).  Follow me on Instagram, Pinterest, Facebook and Bloglovin'.


post signature

12/03/2019

A Long Odds Double Duty Card!

Happy Tuesday!  I have a card today that does double duty for two color challenges.  Normally, my double duty cards are for a sketch and a color challenge.  But this week the hostesses at Splitcoaststampers and CAS Colours & Sketches picked the EXACT SAME colors!  What are the odds of that?!  Well, my husband being the kind of guy he is, calculated it.  Since both challenges use Stampin' Up! colors it limits the color choices a bit but the odds are still a little over 124,000 to 1.  (I neglected to right down the exact number.)  Since it's Christmas and it was likely that the hostesses would choose a red and a green, he factored that in using the red and greens available and then one random color.  The odds were in the neighborhood of 2150 to 1.  Life is interesting with an engineer!

And now my card.
The colors:
The card is pretty straightforward.  The image is die cut from the colors of card stock and sponged with the coordinating to add depth.  I added a neutral - Soft Suede - for my pine cones.

The background is watercolored and splattered with the ink.  I popped the main flower off of the card using foam dots.
CAS Colours &b Sketches is celebrating their birthday this week with some great prizes.  Be sure to visit and enter a card for a chance to win!  The link is above.

Stamps: Stampin' Up! Christmas Rose
Dies: Cottage Cutz Seasons Floral 2
Ink and card stock : Cherry Cobbler, Shaded Spruce, Soft Suede, gold

Thanks for visiting today! Click here to sign up for email notifications of future posts (you will be sent an email to verify your address - don't forget this step).  Follow me on Instagram, Pinterest, Facebook and Bloglovin'.


post signature

11/26/2019

Snow Buddies

I got a chance to color for today's card and am very happy that I could.  I love to color with either markers or pencils as I find it very relaxing.  Unfortunately, when I usually need to relax the most is when I have the least time to color!
This card is for this week's sketch challenge at CAS Colours & Sketches:
When choosing my colors I decided to limit the colors to three plus neutrals.  I guess I've been doing color challenges for too long - I need to limit my colors or I start to feel overwhelmed!  Actually, picking a limited palette at the start is one way to speed up the design process.  I used a combination of Stampin' Blends! and Copic markers to color the main image.

The background was created using a sponge dauber and Pool Party ink.  I heat embossed the snowflakes using iridescent glitter embossing powder.

Stamps: My Favorite Things Snow Buddies
Markers: Stampin' Blends Flirty Flamingo, Pool Party, Purple Posy; various Copic markers

Thanks for visiting today! Click here to sign up for email notifications of future posts (you will be sent an email to verify your address - don't forget this step).  Follow me on Instagram, Pinterest, Facebook and Bloglovin'.


post signature

11/19/2019

Christmas Rose

Time for another color challenge.  I have a more elegant card than I usually post but I do like to change things up a bit.  I'd say many of my cards use more "cute" stamps but I also love florals.  While I vowed to stop buying so many floral stamps, I couldn't resist this one.  It's a limited edition at Stampin' Up! that's only available while supplies last, and I knew if I didn't get it I'd kick myself later.
The colors this week at CAS Colours & Sketches are:
While these are not traditional Christmas colors I felt they weren't so far off that I couldn't use them for a holiday card.  And the pinks were perfect for this stamp.

I heat embossed the image (and the sentiment) in gold then watercolored it using the ink pads and reinkers.  I did add a neutral - Soft Suede - for the pinecones and a light wash behind the floral spray.  I had to be careful not to go overboard as this is a clean and simple challenge.

The sentiment is from a Christmas set that is in the SU Annual Catalog and is one of my favorites.  I used it quite a bit on my holiday cards last year and suspect I'll be using it some more.

I hope you find time to join us for the challenge this week!

Stamps and dies:  Stampin' Up! Christmas Rose Bundle; also available individually - Christmas Rose Stamp Set and Roses die; sentiment: Stampin' Up! Merry Christmas to All
Ink: Blushing Bride, Pear Pizzazz, Rich Razzleberry, Soft Suede
Paper: Watercolor, Whisper White Thick, Gold Foil
Accessories: Aqua Painters

Thanks for visiting today!  If you don't have a Stampin' Up! demonstrator I would love to help you with your card making needs!

Click here to sign up for email notifications of future posts (you will be sent an email to verify your address - don't forget this step).  Follow me on Instagram, Pinterest, Facebook and Bloglovin'.


post signature

11/12/2019

Sketch Challenge Tuesday

Today's card is for the sketch challenge at CAS Colours & Sketches.
This is the posted sketch:
 
We were asked to keep the angular shape in our card.  Since this is not a simple rectangle on its side but actual cut angles, there are two ways to accomplish this.  First is by use of a die and the second is by manual cutting.  To get odd angles like this, simply draw a cross with the intersection at the exact middle of each line then cut from point to point.
Very straightforward.  Or find a die and use that!

For this sweet little hedgehog I used an embossing folder and partially embossed the backgorund so I could glue down my sentiment.  I added some snowflakes and covered them in Wink of Stella although you can't see it in the photos.
A fun quick card for those who don't like to stamp - it's all die cuts!

Dies used: Cottage Cutz Holiday Hedgehog and Happy Holidays; Tonic Studios Diamonds
Inks: Distress Oxides
Paper: Whisper White and an unknown scrap of blue
Accessories: Stampin' Up! Softly Falling embossing folder

Thanks for visiting today!  Click here to sign up for email notifications of future posts (you will be sent an email to verify your address - don't forget this step).  Follow me on Instagram, Pinterest, Facebook and Bloglovin'.

post signature

11/05/2019

Color Challenge Tuesday

For today's color challenge at CAS Colours & Sketches I made a birthday card.  An old friend has a birthday soon and I wanted something delicate and pretty to give her as that fits her - she is both delicate and pretty!  The inside reads "Hope your day brings just what it should...happiness, health & everything good."
The colors this week are Highland Heather, Mango Melody and Poppy Parade.
These colors were challenging for me to work with; I think because I'm not a big fan of Mango Melody.  I find it very bright and almost overpowering.

So for this card I created a watercolor wash with the Mango Melody and the Poppy Parade on a large sheet of mixed media paper.  That toned down the Mango quite a bit.  I cut my butterflies from this sheet and then sponge the edges with the Poppy Parade to add more contrast.

For my background I used the Highland Heather both full strength and sometimes stamping off once.
I finished the card by adding a few rhinestones.  The stamp sets I used are very versatile.  The butterflies are part of a larger die that can be snipped into smaller butterflies.  And the sentiment set has lovely sentiments appropriate for many occasions.

Stamps: Stampin' Up! Beauty Abounds, Special Celebrations
Dies: Stampin' up! Butterfly Beauty
Ink: Highland Heather, Mango Melody, Poppy Parade
Accessories: Rhinestones

Thanks for visiting today!  Click here to sign up for email notifications of future posts (you will be sent an email to verify your address - don't forget this step).  Follow me on Instagram, Pinterest, Facebook and Bloglovin'.


post signature

11/01/2019

Ho Ho Ombre - Aligning Tips for a CAS Card

Happy Friday!  If you follow this blog then you probably know that my favorite style of card is Clean and Simple.  When I saw the Ho Ho Friends die from Cottage Cutz I loved its bold, graphic style and knew it would be perfect for this style of card.
To start I chose three reds that were a progression in color and intensity to create an ombre effect. 
I die cut one set of letters from each red, along with the green holly leaves and the reindeer out of Crumb Cake and black.
Next I added shading to the deer using Distress Oxide inks in Vintage Photo and Tattered Rose.  I purchased inexpensive cosmetic sponges in bulk and these work great for coloring small spaces.
I assembled my reindeer.
For the card base I used an A2 base of white and cut one white panel and three green panels using the largest of the Nested Wacky Stitched Rectangle dies.  I'll use the green ones under the white panel to give dimension and color.
Next is the part that took a bit of concentration.  Clean and simple cards should be pretty precise or they can look off, but a bit of planning is all that is needed.
The key to a card like this is to work from the middle out.  I made very light pencil marks at the halfway point on each long side of the white panel and also at the halfway point on the long sides of the middle red "H".  I erased these later.
I applied snail adhesive to the back side of my "H".  Using a piece of backing saved from an adhesive sheet, I placed it from tick mark to tick mark.  The backing to these adhesive sheets are handy to have around as they are non-stick.  I was able to position the top of my "H", line up the mid points, then slip the backing out from underneath and burnish down the letter, being assured the position was correct.
I glued down the middle "O" leaving the top unglued so I could slip the lightest "O" under it.  The rest went very quickly.  I simply aligned the other letters.
To finish the card I stacked the three green panels underneath and added  my reindeer and holly with berries.

I chose the reindeer to peek out of my card, but this set also comes with Santa, a snowman and penguin.  All wonderful choices for an adorable CAS card!

Dies:  Cottage Cutz Ho Ho Friends and Nested Wacky Stitched Rectangle set
Ink: Distress Oxide Vinatage Photo and Tattered Rose
Paper: Whisper White, Crumb Cake, Black, Poppy Parade, Real Red, Cherry Cobbler, Call Me Clover

Thanks for visiting today!  Click here to sign up for email notifications of future posts (you will be sent an email to verify your address - don't forget this step).  Follow me on Instagram, Pinterest, Facebook and Bloglovin'.

post signature

10/29/2019

Multi-Layer Masking

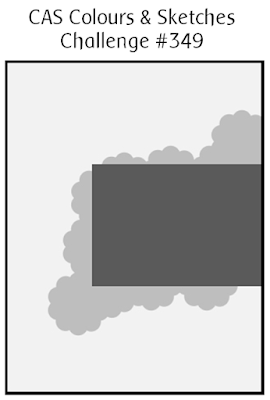
Happy Tuesday!  Today's card is for the double color/sketch challenge at CAS Colours & Sketches.  The inside of the card says "without you".
Here is the challenge that was posted:
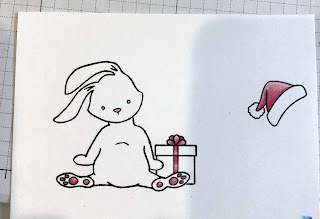
I got part way though coloring this card when I realized I had made a fairly obvious error in my layout.  The bunny and the gift are two stamps so the image needed some masking.  I stamped the bunny first (since he's in front), masked him off and then stamped the gift.  Easy.
See the issue - it wasn't until I went to color the package that I realized that the gift should be behind his foot but IN FRONT of his hand.  Since I had to restamp, I could have just moved the gift up behind his hand only, but I really wanted it between his hand and foot.  I needed to mask and stamp this in stages; only part of the image at a time.  I own both size Mistis and a Stamparatus - I use them all for different things.  For this layered masking, the Stamparatus helped enormously!

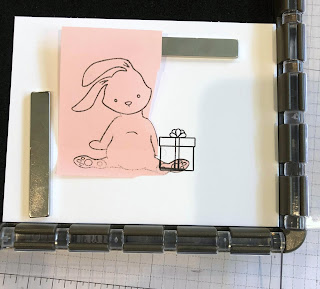
The Stamparatus allows you to use multiple plates as they pop off the base quite easily.  And you can have two plates on the base at one time.
I put the bunny stamp on my bottom plate.  Using a small ink cube I carefully inked up just his foot and stamped that. 
Using a Post-It note I created a bunny mask and cut off his hand so I would get the full gift behind the foot.  The gift was on the right hand plate.  My bunny was kept on the bottom plate.
Then I created a mask of the gift...
and I restamped my bunny using the stamp that was still on the bottom plate.

I mask images quite a bit but most of the time I'm not trying to insert one image into the middle of another.  It's good to know that it can be done.  I could have done this with my two Mistis by moving the image from one to the other, but the Stamparatus made it super simple since I could leave the image in the platform.  I have had it happen that I take an image out of my stamping platform, decide it needs to be restamped and I don't put it back in quite all the way.  Less than a millimeter off can ruin an image.  This kept things very accurate.
 Multi-layer masking is actually quite easy, it just requires a bit of pre-planning and visualizing!

Stamps: Honey Bee Stamps Blah Humbunny
Dies: Honey Bee dies to match; Cottage Cutz Stitched Squares and Scalloped Squares
Copic markers: RV11, RV32, RV34, B0000, B21, B23 N0, N1, W00, W1, B91, B93, B95, B97
Accessories: Stampin' Up! Stamparatus

Thanks for visiting today!  Click here to sign up for email notifications of future posts (you will be sent an email to verify your address - don't forget this step).  Follow me on Instagram, Pinterest, Facebook and Bloglovin'.


post signature

10/22/2019

Happy Fall Y'all

Happy Tuesday and Happy Fall!  Today's card was made for two challenges - the sketch challenge at CAS Colours & Sketches and the color challenge at Splitcoaststampers.
Here is the posted sketch which I rotated:
The colors are Cajun Craze, Daffodil Delight and Merry Merlot.

The card was very simple - I colored the image with a combination of Stampin' Blends and Copic markers.  If I had to do it again, I would have used watercolor on the leaves to blend them a bit more but all in all it turned out okay.


Stamps: Simon Says Stamp Happy Fall
Ink: Stampin' Blends Daffodil Delight Dark, Cajun Craze Dark; Copic markers: R59, Warm Gray W00, W1, W2, W3
Dies: MFT Stitched Basic Edges

Thanks for visiting today!  Click here to sign up for email notifications of future posts (you will be sent an email to verify your address - don't forget this step).  Follow me on Instagram, Pinterest, Facebook and Bloglovin'.


post signature