4/28/2020

Flower Pot Thank You

It's a two-fer Tuesday for me this week!  The CAS Colours & Sketches blog is having a sketch challenge so I could combine that with the color challenge at Splitcoaststampers.  Which is good because I spent most of my weekend organizing my cardstock!  I'll have a post later this week with what I did and how I did it!  Now for today's card.
The colors are Mango Melody, Poppy Parade and Cajun Craze. And here is the sketch:
I decided to go floral but wanted to stay away from looking like fall.  I toyed with using different sentiments that accentuated the one red flower (like "be yourself" or "you are amazing") but decided that the generic "thanks" was a bit more useful.  I guess I'm a sentiment wimp.  I make more cards than I send so I'm not sure why this was important at the time.  Perhaps because I really like this card and will send it.  It was simple to make and I can easily make more in other colors.
The card is essentially flat for mailing.  I did use foam tape behind the rectangle which makes it stand out, but that doesn't add enough dimension to be concerned about mailing.

Dies: Cottage Cutz Mouse with Garden Wagon, Potted Plants, Stitched Scalloped Rectangles
Stamps: Stampin' Up! Cottage Greetings

Thanks for visiting today! Click here to sign up for email notifications of future posts (you will be sent an email to verify your address - don't forget this step).  Follow me on Instagram, Pinterest, Facebook and Bloglovin'.

post signature

4/23/2020

Bloomin' Pup

Happy Fridays!  Today I have a clean and simple card featuring dies from Cottage Cutz beautiful new Gardening release.  
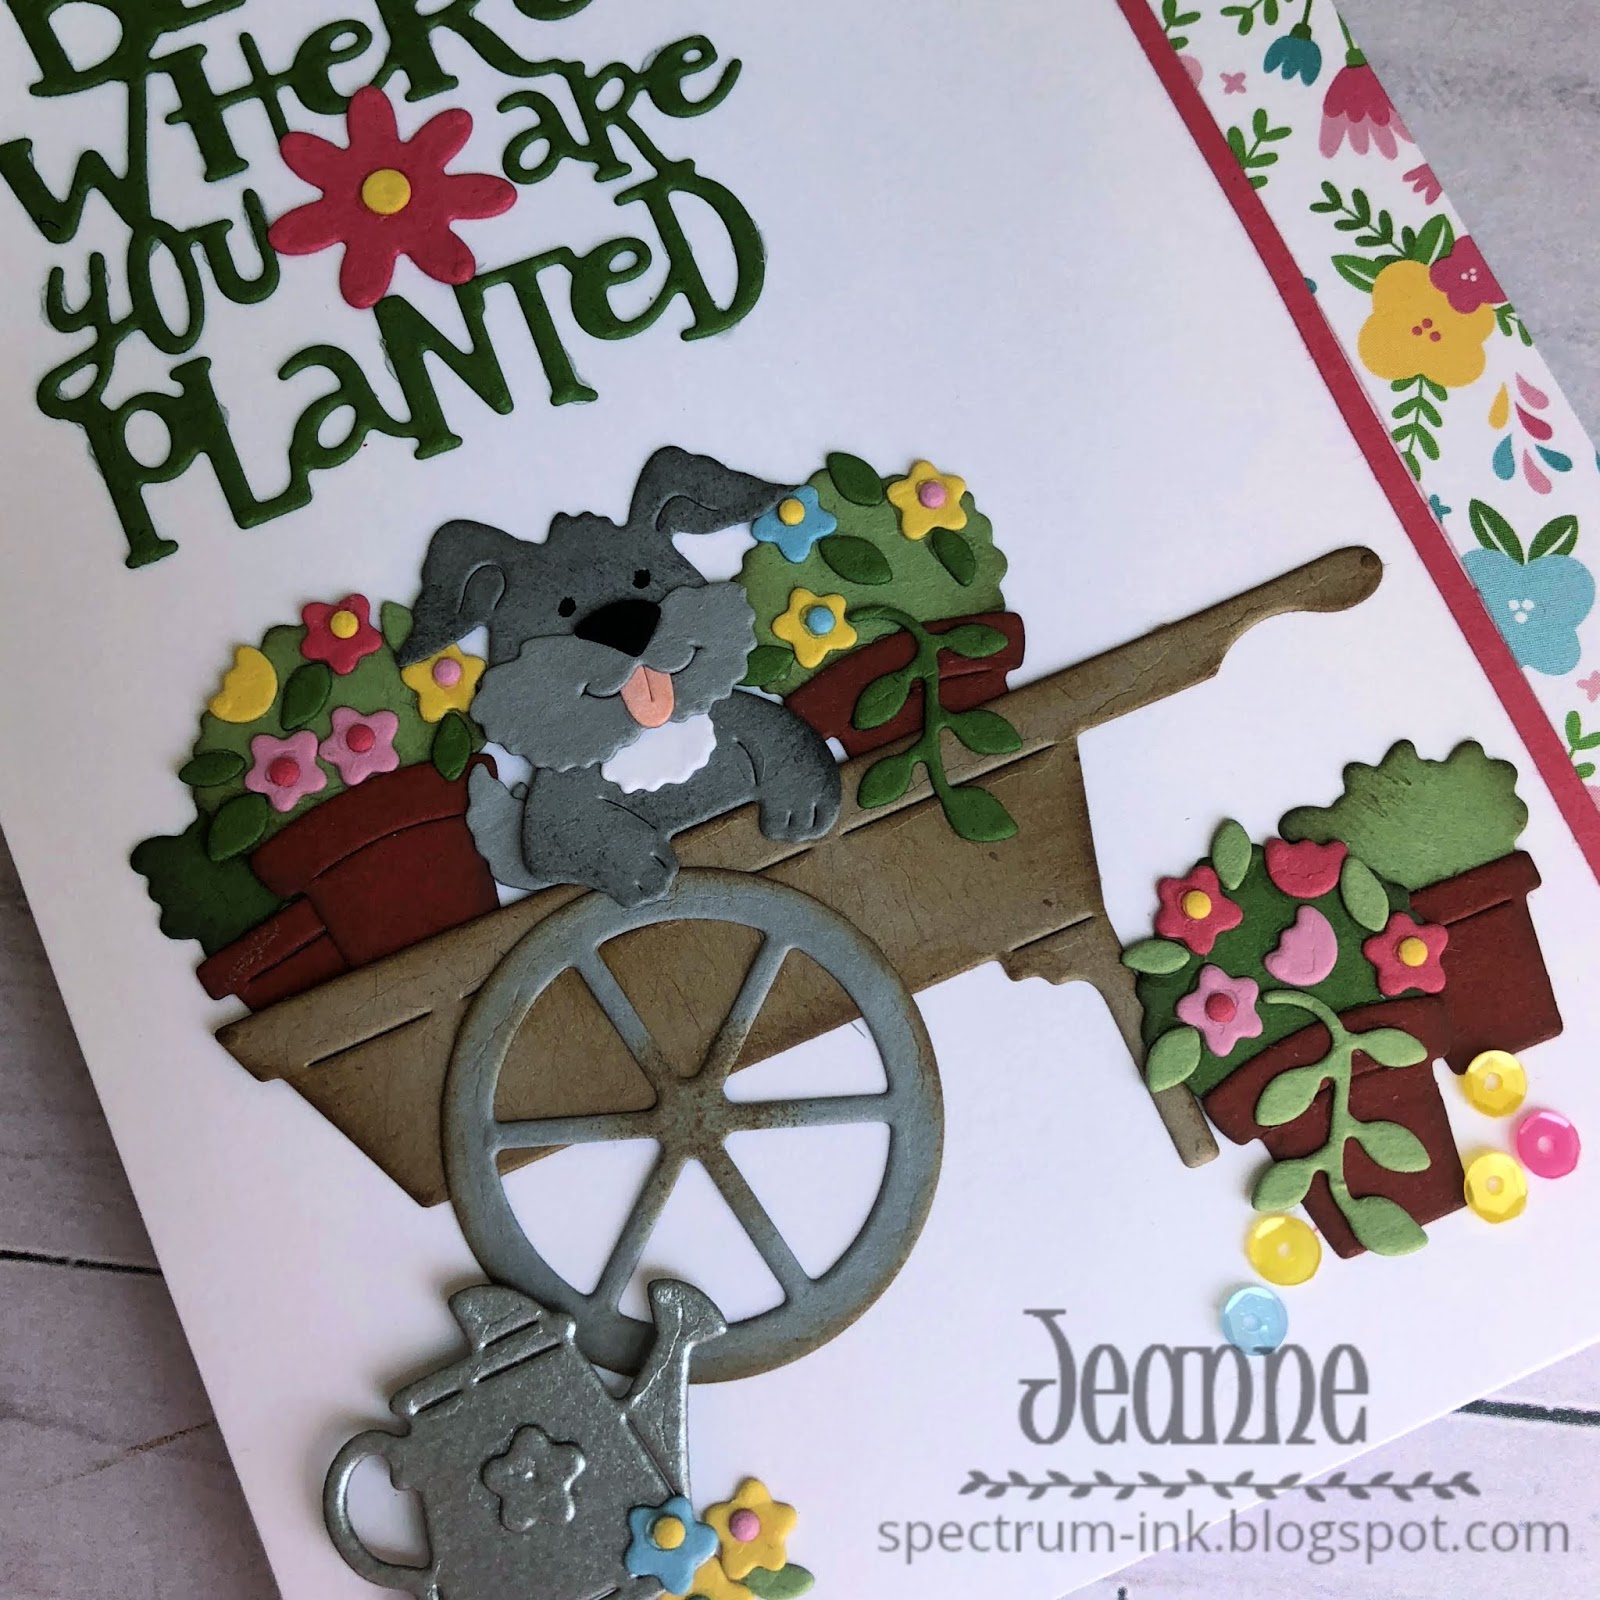
All the dies are wonderful, but I fell in love with the Puppy in Garden Cart die as soon as I saw it! This little guy poking through the flowers is adorable.

I picked the colors for my card from the patterned paper.  From there it was jsut a matter of cutting enough of the flowers!  And there were a lot! I used Distress Oxide ink in Vintage Photo to edge and shade the cart, pots and greenery.  I used Basic Grey for the pup.

Everything is glued flat on the panel.  When I added the watering can I used a foam dot to pop it up from the card.

I added a few matching sequins near the lower pots and a very thin strip of solid pink cardstock next to the floral strip to finish everything off.

Dies: Cottage Cutz Puppy in Garden Cart, Garden Phrases, Gardening Tomte
Paper: Lawn Fawn Spring Fling
Accessories: Pretty Pink Posh sequins

Thanks for visiting today! Click here to sign up for email notifications of future posts (you will be sent an email to verify your address - don't forget this step).  Follow me on Instagram, Pinterest, Facebook and Bloglovin'.

post signature

4/21/2020

A Nautical Color Challenge

Happy Tuesday.  It's another color challenge at CAS Colours & Sketches blog.  The colors this week are bright and bold!  They reminded me of nautical colors, so I ran with that theme.
The colors this week are Blueberry Bushel, Pineapple Punch and Call Me Clover.
https://cascoloursandsketches.blogspot.com/2020/04/challenge-367-colors.html
I had planned to do some stamping of the images but ultimately used die cuts with only the sentiment stamped.

I stacked the green behind the blue die cuts to give it a little edge.  this was a super quick card to make and perfect for any gender or age.

Stamps: My Favorite Things Go Overboard
Dies: MFT Let's Get Nautical

Thanks for visiting today! Click here to sign up for email notifications of future posts (you will be sent an email to verify your address - don't forget this step).  Follow me on Instagram, Pinterest, Facebook and Bloglovin'.

post signature

4/20/2020

A Gnomey Thanks and Color Matching with Copic Markers

Hello everyone!  I'm the hostess this week for Splitcoaststampers Color Challenge.  Their challenge rules allows us to use the recently retired (within the past year) Stampin' Up! In-Colors.  The 2017-2019 colors had several of my favorite colors so I chose them this week.
The colors I chose this week are Lemon Lime Twist, Berry Burst and Powder Pink.
I decided to use an old stamp set  that ad never seen ink.  I love seeing all the gnome stamps out there and toyed with the idea of getting a new set, but then I thought "why?".  I am trying to make an effort to use things I already have and boy, do I have stamp sets!

I color matched the colors using Copic markers.  To learn more about how to color match check out my posts here and here.

The paper is some that was retired along with the colors.  I die cut the word "Thanks" and used a stacked technique so that the word would have a nice colored edge.  To get it exactly in place on the panel, I cut the word from the gnome panel and placed the stacked word in the negative space.   The die is one word so the letters are perfectly placed.
For the rhinestone bling I colored clear rhinestones with the markers.

Stamps: My Favorite Things You Gnome Me
Dies: MFT Thanks
Markers: Berry Burst - RV10, RV11, RV17, RV19; Powder Pink - R00, R01, R11, R12; Lemon Lime Twist - YG00, YG21, YG23; Skin - E50, E51, E11; Boots - E23, E29; Beard/shadow - N0, N1, N2

Thanks for visiting today! Click here to sign up for email notifications of future posts (you will be sent an email to verify your address - don't forget this step).  Follow me on Instagram, Pinterest, Facebook and Bloglovin'.


post signature

4/16/2020

Die Cuts as the Focal Point

Today I have card with a sentiment I love and find inspirational - "Good things are sure to happen."  I think this sentiment is particularly good for these times - good things are going to happen, we just may just have to wait a bit.  This card uses dies to accentuate the stamping and give the card its focal point.

To start, I cut a piece of mixed media paper to 5 1/2 x 5 1/2 inches and taped it to a masonite board for watercoloring.
I used a large watercolor brush and a light green ink to create a wash on the upper right and lower left corners of my paper.
I then used foliage and typography stamps with both the green and a light brown ink.  I stamped while the wash was damp and also after drying it with a heat tool.  This is a very loose process and there is no one way to do it.  Things come out differently every time but that is part of its beauty!
I cut my panel to 5 1/4 x 5 1/4 then stamped my sentiment in the brown.  I used a sponge with brown ink to go around the edges.
I mounted the the panel to a brown 5 3/8 x 5 3/8 inch panel and this I mounted to a top fold 5 1/2 x 5 1/2 inch card base.  Because the mixed media panel was a bit buckled, I used heavy books on top of the card to weigh everything down for a few minutes.  This got it nice and flat.

Now for my dies.
I cut all the butterflies (Springtime Butterflies) and some foliage (Spring Blooms) from gold foil cardstock.  I cut more than I needed but wanted some extra to play with the layout.
I ended up using just one butterfly.  I put some foam tape across it's body so it would stand up from the card and I could curl up the wings just a bit.  This really makes the butterfly stand out and "pop" against the background.
Finally I added some gold foliage in the lower left along with gold glitter enamel dots.

Dies: Cottage Cutz Springtime Butterflies and Spring Blooms
Stamps: Stampin' Up! Butterfly Basics, Tasteful Textures, Very Versailles, First Frost
Ink: Stampin' Up! Pear Pizzazz, Soft Suede

Thanks for visiting today! Click here to sign up for email notifications of future posts (you will be sent an email to verify your address - don't forget this step).  Follow me on Instagram, Pinterest, Facebook and Bloglovin'.

post signature

4/14/2020

Two for Tuesday

Today I have a card I made for two challenges - the sketch challenge at CAS Colours & Sketches and the color challenge at Splitcoaststampers.  It was a fun card to make - I really love this image and the Vespa worked perfectly with the colors.  My husband even said that the mint color is one of the original colors for a Vespa.
The sketch challenge:
and the colors are So Saffron, Mint Macaron and Petal Pink.  Because of the angled panel and the size of the die I made this a 5 x 7 inch card.

And now for a bit of an embarrassment about this.  The card samples from Spellbinders all have the balloons saying "CIAO" and you can cut the balloons with those letters (they are removable).  They also give you a J, Y, E, N.  For some reason I could not figure out why.  (Even though they also give you the script words "the" and "ride").  So I came up with "Joy Ride".  It wasn't until after the card was made I realized they gave you those letters to make "Enjoy the ride"!  Oh well - next time!
Because the challenge at Splitcoaststampers also had a "dessert" option of a wedding, baby or graduation card I decided to make another card with a wedding theme.  This card is also all die cuts.  It took a little while to make the card but now that I have made it once I think  could reproduce it fairly quickly.  I used colored cardstock and rhinestones for the flower centers.  This would be a great way to use up some scrap cardstock as other than the white, I didn't use much cardstock at all!

Dies: Spellbinders Scooter, Spellbinders Small Die of the Month January 2020 (LOVE)
Paper: So Saffron, Mint Macaron, Petal Pink, Basic, Gray, Magnolia Lane DSP
Accessories: Rhinestones

Thanks for visiting today! Click here to sign up for email notifications of future posts (you will be sent an email to verify your address - don't forget this step).  Follow me on Instagram, Pinterest, Facebook and Bloglovin'.


post signature

4/12/2020

3-D Easter Projects

Happy Easter!  I hope everyone had a great day!  I thought it was wonderful that so many churches held virtual services today - truly an example of adapting to circumstances and making the best of a situation.  It was a bit odd to see St. Peter's in Rome so empty but also heartening that even an institution as old as the Church can adapt to modern ways.

I'm a little late posting these cards today and they are very secular crafts for Easter, but I hope you find them inspirational.   I really enjoy making 3-D items - especially card-in-a-box.  There are an infinite way to fill these.
This card uses dies from several manufacturers although the main dies are from Spellbinders Die of the Month.  I sent this to my daughter who we hadn't seen since January (one reason I had to wait to post - so she wouldn't see it).  Now with the stay-at-home we can't see her today.  I hope it brightened her day.

I took to my scrap box and started cutting lots of flowers in various colors  (great way to use them up.)  The background sky is stenciled with clouds using Soft Sky ink and My Favorite Things Small Cloud stencil.  For the box I used Crumb Cake cardstock and Stampin' Up!'s Basket Weave embossing folder.

This adorable basket is made using only the Spellbinders Large Die of the Month March 2020 die.  I think it could fold flat for mailing as there are score lines on the supports between the front and back, although I haven't tried it.
I hope you've enjoyed today's post and it gives you some inspiration.

Card-in-a-Box:
Spellbinders Small Die of the Month March 2020
The Stamps of Life 5 x 7 Box Card
My Favorite Things Grass Edge
Cottage Cutz Hello Spring Bloom
The Stamps of Life Shadow Box Card (cloud)

Basket:
Spellbinders Large Die of the Month March 2020

Thanks for visiting today! Click here to sign up for email notifications of future posts (you will be sent an email to verify your address - don't forget this step).  Follow me on Instagram, Pinterest, Facebook and Bloglovin'.

post signature

4/07/2020

All Die Cut Easter Card

Good morning!  I have an Easter card that uses all die cuts. I'm a member of the Spellbinders small and large dies of the month and I received these for March - I think they are adorable!  So I went a bit crazy this weekend using the dies.  This card is for the color challenge at CAS Colours & Sketches and I'm planning to send it to a friend.
Here are the colors:
Petal pink is actually a very peachy pink.  I used the Stampin' Up! subtles DSP from 2019-19 and this is the Petal Pink.  It looks peachy to me and at first I thought it is because it is two-toned, but the bunny's inner ears and the flower centers are cut from the solid color cardstock and also have that rosy glow!

To make the carrot shaker I originally cut two layers of self adhesive fun foam and planned on stacking it.  However, the foam got really flattened going through my die cutter.  It just wasn't deep enough for a shaker card.  I ended up cutting 8 layers of Petal Pink cardstock and stacking them for the shaker outline.  I saved the fun foam pieces and will see if they expand to their usual depth in a few days.  If they do, then I'll know I just have to plan better in order to use it!  For the acetate window, I traced around the carrot on a window sheet and cut it out by hand, slightly inside my drawn line.

I also made a basket of bunnies and a card-in-a-box that I've sent to my youngest daughter.  I'll post photos and details of those later this week.

Dies: Spellbinders Small Die of the Month March 2020
Papers: Highland Heather, Mint Macaron, Petal Pink, Stampin' Up! Subtles DSP, Whisper White thick, acetate window sheet
Accessories: Pretty Pink Posh Clear Sequins

Thanks for visiting today! Click here to sign up for email notifications of future posts (you will be sent an email to verify your address - don't forget this step).  Follow me on Instagram, Pinterest, Facebook and Bloglovin'.

post signature