It's the last challenge for 2018 at CAS Colours & Sketches! This week is "chose a previous sketch" challenge and make it seasonal. I chose #265. I also decided to combine this challenge with this week's color challenge at Splitcoast Stampers - Petal Pink, Mint Macaron, and Highland Heather.
This Stamping Bella image is one I've been wanting to color for quite some time. The colors seemed perfect for it. I really would have liked to try this in Copics but because of time constraints I used the re-inkers and water colored the image. I did add some grey for the mouse and bear along with the shadows.
The image called for sparkle so I used a Versamark pen and Heat 'n Stick powder along with some glitter to give a dusting of "snow" (or maybe sugar) to the berries, leaves and sprinkles. I also added a few snowflake sequins and glued rhinestones to the center. (Can you ever have too much bling?)
Stamps & dies: Stamping Bella Polar Bear on a Cupcake, MFT Tags
Ink: Stampin' Up! Petal Pink, Mont Macaron, Highland Heather, Smoky slate, Grey Granite
Accessories: Versamark pen, Heat 'n Stick Powder, Dazzling Diamonds glitter, sequins, rhinestones, ribbon
Thanks for visiting today! Click here
to sign up for email notifications of future posts (you will be sent an
email to verify your address - don't forget this step). Follow me on
Instagram, Pinterest, Facebook and Bloglovin'.
12/11/2018
12/04/2018
Joyful Christmas Pup
Happy Tuesday! We're down to the last few challenges this year at CAS Colours & Sketches. And it's time to make it seasonal. The challenge is to pick any 2018 color challenge and make it a seasonal card. I chose the colors from challenge 266 - Calypso Coral, Old Olive and Rich Razzleberry.
I love this stamp set and have colored another dog from this set in non-traditional Christmas colors. I also seem to always make these dogs spotted. I guess I like spotted dogs!
The sentiment I think says it all for this pup. He has definitely been joyful - enough to bring down the tree. At our house it is more likely to be the cats who topple the tree!
Hard to see in photos but I added Wink of Stella to the star to make it glimmer and then three small dots of Diamond Stickles to give it just a bit more sparkle.
Stamps: MFT Happy Pawlidays
Dies: Cottage Cutz Wacky Stitched Rectangles
Markers: Stampin' Blends in Rich Razzleberry, Calypso Coral and Old Olive Dark and Light; Copic markers in RV63, R01, YG21, E 34, E35, E37, N0, N1, N2, N3
Thanks for visiting today! Click here to sign up for email notifications of future posts (you will be sent an email to verify your address - don't forget this step). Follow me on Instagram, Pinterest, Facebook and Bloglovin'.
12/03/2018
Hawaiian Holiday - So Santa Cards
Aloha! I love warm weather themed Christmas cards! After spending 20+
years of having white Christmases I've moved back to warmer weather and
split my time between So Cal and Hawaii. So while I enjoy making the
traditional snowflakes and mittens type cards, I really love when I can
use a tropical twist on holiday cards.
This stamp from the So Santa set is a favorite. As soon as I saw it I knew it would pair perfectly with the Tropical Chic set I already had. Since these cards are for the color challenge at Splitcoast Stampers I had to stick with the challenge colors of Blushing Bride, Melon Mambo and Pear Pizzazz plus neutrals.
I used an Aqua Painter and also a blender pen for the tight areas to water color the main image. The Night of Navy (a SU neutral this year) is used very lightly in the background for the sky. I stamped and cut the flowers using the pinks and I cut the foliage from Pear Pizzazz card stock and sponged the edges with the same color ink.
I wanted this to have that vintage Hawaiian feel so I used Crumb Cake to distress the edges of both the Santa panel and and the wood grain DSP.
Since I had colored a second image (in case number one didn't turn out) I made a second card that is a bit more clean and simple.
To get the water color look on the foliage I misted the stamp with water after inking it but before stamping giving it a watery look.
I hope you enjoyed my cards today and MELE KALIKIMAKA!
Supplies:
Stamps:
So Santa
Tropical Chic bundle
Dies:
Stitched Shapes
Ink:
Blushing Bride
Melon Mambo
Pear Pizzazz
Crumb Cake
Smoky Slate
Night of Navy
Paper:
Wood Textures
Tropical Escape
Accessories:
Aqua Painter
Blender Pen
Thanks for visiting today! Click here to sign up for email notifications of future posts (you will be sent an email to verify your address - don't forget this step). Follow me on Instagram, Pinterest, Facebook and Bloglovin'.
11/27/2018
Buzzing By....
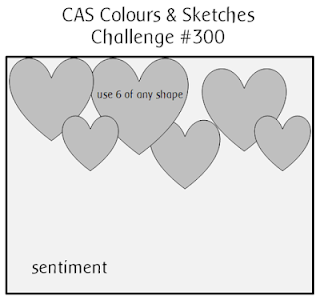
Happy Tuesday and Happy Birthday to CAS Colours & Sketches challenge. This week marks its sixth birthday and 300th challenge! We'd love to have you join us in this week's sketch challenge!
Here is my Design Team Card:
And the posted challenge:
This was a super easy card to make with minimal coloring and shading.
I kept it flat for mailing but could easily have added a bit more interest by using foam dots under some of the hexagons.
Stamps: Honey Bee Stamps Bee-You-Tiful Sentiments and Busy Bees
Dies: My Favorite Things Hexagons
Copic Markers: Y15, Y19, RV04, RV09, N7, N9
Thanks for visiting today! Click here to sign up for email notifications of future posts (you will be sent an email to verify your address - don't forget this step). Follow me on Instagram, Pinterest, Facebook and Bloglovin'.
11/26/2018
Snow is Glistening Tree
I hope everyone had a good weekend! We got our Christmas tree mostly up and I had a chance to work on some cards. My card today is for this week's color challenge at Splitcoast Stampers where Mary is the hostess. She has chosen Tranquil Tide, Lemon Lime Twist and Gold. Not exactly traditional Christmas colors but ones that work beautifully with today's card.
This was a super easy card to make. I used my Stamparatus to stamp the tree and trunk in Tranquil Tide ink. Then I went over what I had stamped with Versamark ink and used clear embossing powder to heat emboss over the tree and trunk in clear. I also heat embossed the sentiment in gold.
Next I used my aqua painter to wash over the tree with water; some of the Tranquil Tide ran give a nice light blue to the background but the snowflakes stayed in tact. Then I added a wash of Lemon Lime Twist.
Finally I mounted it all to an A2 card base and added a 1/4 inch strip of gold foil card stock and A gold enamel star to the tree top!
Supplies - Note that the Stamp set Snow Is Glistening is only available until November 30, 2018!
Through November 30 use host code MS7J9VKT if your order is under $150. If your order is over $150, don't use the code so YOU receive host benefits!
Stamps: Snow is Glistening
Ink:
Lemon Lime Twist
Tranquil Tide
Versamark
Paper:
Watercolor
Gold Foil
Accessories:
Stamparatus
Clear Embossing Powder
Gold Embossing Powder
Aqua Painter
Thanks for visiting today! Click here to sign up for email notifications of future posts (you will be sent an email to verify your address - don't forget this step). Follow me on Instagram, Pinterest, Facebook and Bloglovin'.
11/23/2018
Making Multiple Cards
Happy Black Friday! I
hope you all had a wonderful Thanksgiving. Now it's time to get ready
for Christmas. The last few years our Christmas has been rather last minute, but this year I've already started shopping and the tree will go up this weekend.
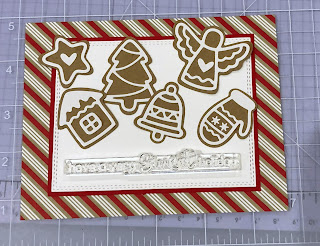
Even after my Thanksgiving cooking I'm still in the mood for more - sort of. I'm featuring cookies today, only they are made out of paper!
This card is made from die cuts and goes together very quickly. Handmade Cookies 1 and 2 are two dies that can be run through the Big Shot together and each die cuts four cookies at once. Run them through your Big Shot several time you'll have lots of cookies! I used six cookies for this card. As long as you don't mind the cards being slightly different just use six different cookies on each card you make.
To keep these easy I use Kraft paper for the cookie base and glossy white card stock for the icing. Adding self adhesive sheets to the back of the white makes assembly super quick.
I placed the cookies on the card but did not glue them down. This helped me position my sentiment and then I used my stamping platform to stamp it in red. Keep the stamping platform loaded up and you could print off multiples in no time!
I glued most of the cookies to the card base, but used foam dots to pop up the tree and the angel. Finally I added a few sequins for sparkle.
This card goes together quickly and would be perfect for making multiple cards. It is also relatively flat for mailing (totally flat if you eliminate the foam dots under the angel and the tree.)
I kept my card simple. But I really had to resist the urge to "sparkle up" those cookies! Just like real cookies, you could get pretty fancy in your decorating. Add some Nuvo drops, Stickles, glitter, etc! The possibilities are endless....
The secret to making multiple cards is to keep it simple and economize your work. The ability to make a bunch of cookies at one time makes this card easy. And a stamping platform (I used my Stamparatus) is essential for the stamping. If you don't own one you should put it on your list to Santa! You could even send Santa the link below ;)
Dies: Cottage Cutz Handmade Cookies 1, Cottage Cutz Handmade Cookies 2, Cottage Cutz Double Stitched Nested Rectangle
Stamps: Lawn Fawn Merry Messages
Card stock: Stampin' Up! Glossy White, Stampin' Up! Retired Christmas paper, Kraft
Ink: Stampin' Up! Real Red
Accessories: Stamparatus
Thanks for visiting today! Click here to sign up for email notifications of future posts (you will be sent an email to verify your address - don't forget this step). Follow me on Instagram, Pinterest, Facebook and Bloglovin'.
Even after my Thanksgiving cooking I'm still in the mood for more - sort of. I'm featuring cookies today, only they are made out of paper!
To keep these easy I use Kraft paper for the cookie base and glossy white card stock for the icing. Adding self adhesive sheets to the back of the white makes assembly super quick.
I placed the cookies on the card but did not glue them down. This helped me position my sentiment and then I used my stamping platform to stamp it in red. Keep the stamping platform loaded up and you could print off multiples in no time!
This card goes together quickly and would be perfect for making multiple cards. It is also relatively flat for mailing (totally flat if you eliminate the foam dots under the angel and the tree.)
I kept my card simple. But I really had to resist the urge to "sparkle up" those cookies! Just like real cookies, you could get pretty fancy in your decorating. Add some Nuvo drops, Stickles, glitter, etc! The possibilities are endless....
The secret to making multiple cards is to keep it simple and economize your work. The ability to make a bunch of cookies at one time makes this card easy. And a stamping platform (I used my Stamparatus) is essential for the stamping. If you don't own one you should put it on your list to Santa! You could even send Santa the link below ;)
Dies: Cottage Cutz Handmade Cookies 1, Cottage Cutz Handmade Cookies 2, Cottage Cutz Double Stitched Nested Rectangle
Stamps: Lawn Fawn Merry Messages
Card stock: Stampin' Up! Glossy White, Stampin' Up! Retired Christmas paper, Kraft
Ink: Stampin' Up! Real Red
Accessories: Stamparatus
Thanks for visiting today! Click here to sign up for email notifications of future posts (you will be sent an email to verify your address - don't forget this step). Follow me on Instagram, Pinterest, Facebook and Bloglovin'.
11/20/2018
Joyful Wishes
Happy Tuesday everyone! I hope you're not too stressed getting ready for Thanksgiving. I'm surprisingly calm considering the state of my house and the fact that I have 19 people coming to dinner on Thursday! But I find it fun and wouldn't trade hosting Thanksgiving for anything.
Now on to this week's DT card for the CAS Colours & Sketches challenge.
The colors this week are:
I must admit that the colors challenged me a bit at first, but once I started on this card I almost couldn't stop coloring. I tried making the mugs all three colors but liked it best with them all the same. My Tranquil Tide is there - the sentiment is stamped in it and I used two layers of Tranquil Tide card stock under the stitched square.
To get the candy canes to fit in the mug I carefully used an Exacto knife right along the mug edge.
This was a super fun card to make. To get a little bit of sparkle, I used a Versamark pen, some Heat & Stick powder and glitter on the snowflakes. Then I heat embossed the milk in the latte with white embossing powder. It's little things like that which make cards fun.
This stamp and die set has so many possibilities! It's one of my favorites.
Stamps and dies: Lawn Fawn Thanks a Latte
Dies: MFT Stitched Rectangles
Markers: Stampin' Up! Blends Cherry Cobbler Light and Dark, Mint Macaron Light and Dark, Copic markers G0000, R81, E23, E25, N0, N1
Thanks for visiting today! Click here to sign up for email notifications of future posts (you will be sent an email to verify your address - don't forget this step). Follow me on Instagram, Pinterest, Facebook and Bloglovin'.
11/13/2018
Painted Flowers
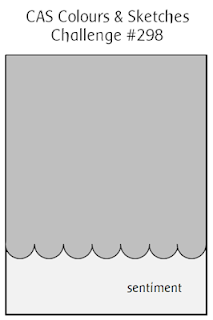
Today's card combines challenges from two different sources - Splitcoast Stampers Color Challenge and CAS Colours and Sketches Sketch challenge. The colors at Splitcoast Stampers this week are very close to the colors from last week's color challenge at CC&S.
Here is the sketch:
The colors are Pineapple Punch, Granny Apple Green, Balmy Blue and Rich Razzleberry.
I used a curved scallop die instead of a straight one (I don't have a straight one) and a stamp set that I've had for some time but have never used. A NBUS (never been used stamp) is the dessert option this week at SCS. This Alenew set is beautiful but it took me some time to really figure it out in terms of lining up the images. Thankfully, the style is loose so precision in alignment isn't necessary! Instead of using two colors for the flowers I opted to stamp off the first layer and stamp the second layer full strength. I tried using the berry over the yellow but did not like the look. I also stamped off the green to make it lighter.
To add my touch of Razzleberry I decided upon a single glitter enamel dot. I thought the green, yellow and blue were so pretty together I didn't want to overpower it with the berry.
Stamps: Altenew Painted Flowers
Die: Simon Says Stamp
Paper: Stampin' Up! Subtles DSP stack
Thanks for visiting today! Click here to sign up for email notifications of future posts (you will be sent an email to verify your address - don't forget this step). Follow me on Instagram, Pinterest, Facebook and Bloglovin'.
11/06/2018
A Little Bird and Card Challenges
It's Tuesday and another color challenge at CAS Colours & Sketches. I made two cards this week. Not by design but because after I finished my first card I realized that it was perhaps a bit off the mark for the challenge. I went back to the drawing board (so to speak) and came up with this card.
The posted challenge:
Simple enough - fairly straight forward. The birds above use a two step stamp set. I used one color
per bird and splattered the Balmy Blue ink using a watercolor brush. The brush was wet when I dipped it in the ink but I did not add water to the ink so that the blue color wasn't diluted. Since I didn't add water, I REALLY had to load the brush with ink to get it to splatter.
My first card (below) uses the same birds but a different sentiment set. While I really like this card, there were several issues with it so I decided not to use it as my Design Team card this week.
I like to watercolor my backgrounds and did so here. I know that blue and yellow combine to make green but in person you can see the layers of blue and yellow on the panel. The green in the background is not SO green. I was afraid this made it look like I had added another color. And after adding all the layers I decided the card was just a bit too far from being "clean and simple" - part of the name of the challenge! As part of the design team I didn’t want it looking like I went rogue!
That said, all card challenges (at least the ones I participate in) are for FUN! While "following the rules" is what makes them challenges, fun is the most important element in them. I enjoy entering them because they often get me to think outside of my comfort zone, use supplies that I haven't used before, or make part of the design decision for me allowing me to focus on other parts of the card.
Stamps: MFT Mod Birds, MFT Sassy Pants Best Friends, Picket Fence Levels of Friendship
Dies: MFT Mod Birds, MFT Peekaboo Window
Thanks for visiting today! Click here to sign up for email notifications of future posts (you will be sent an email to verify your address - don't forget this step). Follow me on Instagram, Pinterest, Facebook and Bloglovin'.
11/04/2018
Pumpkins Everywhere
Happy Sunday! I hope you are having a good weekend. The card that I'm posting today has no stamping - just die cuts. While I know many of you are stampers, I also know that there are those who prefer dies. In fact, I have a friend who makes only die cut or punched cards. She has a Big Shot, but only a couple of stamps! And they're sentiment stamps - no images.
The card was inspired by this week's Fusion challenge:
I chose to use both elements of inspiration - the sketch and the theme. I interpreted things pretty literally just changing the oval to a pie. There are times when doing challenges I interpret things in a looser way. But I love fall colors so I just had to go with a total autumn look.
I die cut the various pieces in colored card stock and tipped the edges with ink to add dimension. Often I will cut the pieces from white and use markers or ink to color them but this time I felt the colored card stock was best.
And of course I added sequins for some sparkle. (I just organized my sequins so you'll be seeing more of them in upcoming cards now that I know what I have!)
Dies: Cottage Cutz Pumpkins and Vines, Pumpkin Pie & Latte, Double Stitched Circle Set
Paper: Echo Park Celebrate Autumn
Thanks for visiting today! Click here to sign up for email notifications of future posts (you will be sent an email to verify your address - don't forget this step). Follow me on Instagram, Pinterest, Facebook and Bloglovin'.
11/02/2018
Fur Baby Congratulations
Happy Friday!!! Are you looking forward to the weekend? I am! Today I have a simple card that is perfect for those friends who have just become fur parents. (My husband would just die if he heard me say that. He hates when I call our dog the fur baby!)
This cute little guy is a new die from Cottage Cutz. Although he can be for Christmas (he comes with reindeer antlers and a Santa hat) I chose to make him without costume.Very simple to make. The dog is all die cut and the sentiment is heat embossed on a panel slightly smaller than the die cut frame. I embossed the white panel using a paw print embossing folder.
The framed panel is popped off the embossed panel using foam tape and the whole thing is adhered to a red top folding A2 card base. This is super simple to make, but sometimes that is just what you need!
Stamp: MFT New Best Friend
Thanks for visiting today! Click here to sign up for email notifications of future posts (you will be sent an email to verify your address - don't forget this step). Follow me on Instagram, Pinterest, Facebook and Bloglovin'.
10/30/2018
Mermaid Dreams
I was going to post this Monday and say it was "Magical Monday" but my internet connection was so poor last night I couldn't do it. AUGH!!!! technology... And that's why I love my art! It's low tech.
This card is for the color challenge at Splitcoast Stampers this week - Bermuda Bay, Cherry Cobbler and Blueberry Bushel. This really was challenging for me and I had a tough time thinking of an image to use. Then I came across this Laurel Burch stamp.
I have loved her artwork since the 80s and when I discovered that some of it was being released in stamps I was so excited! If you are not familiar with her, her art is very graphic, colorful and whimsical. Unfortunately she passed away in 2007, but has left beautiful art as her legacy.
When coloring this I tried to stay somewhat true to her style. I used ZIG Kuretake brush markers in order to get depth of shading. The most difficult part of the card for me was the layout. I wanted it to be somewhat organic. I used a swirl embossing folder on Vanilla card stock and the distressed that with sand paper and some Distress Oxide Antique Linen ink. The mermaid panel was too pristine so instead of die cutting out the panel I ripped the edges - always a hard thing to do!
The dessert option this week is to add some shimmer or sparkle so after tearing I touched the edges with both Antique Linen and shimmer paint. It is all mounted to a shimmery piece of card stock that my mother-in-law gave me. I have no idea what it is, but it's pretty! I cut the word Dream from the same card stock.
Stamp: Stampendous Laurel Burch Mermaid
Die: Penny Black
ZIG Kuretake Brush Pens: Persian Blue, Turquoise Green, Wine Red, Olive Green, Beige, Flesh Color, Dark Brown
Ink: Distress Oxide Antique Linen, Stampin' Up! Frost White Shimmer Paint
Embossing Folder: Stampin' Up!Swirls and Curls
Thanks for visiting today! Click here to sign up for email notifications of future posts (you will be sent an email to verify your address - don't forget this step). Follow me on Instagram, Pinterest, Facebook and Bloglovin'.
Christmas Wishes Turnabout Card
Happy Tuesday! This week's challenge at CAS Colours & Sketches is both a sketch and color challenge. The colors made me think of Christmas - maybe because I'm starting to get nervous about having all my cards made!
Here is the challenge:
I created the patterned panel by using a new stamp I just purchased call a "turnabout" stamp. It's from Concord and 9th. You put you paper in a stamping platform that will hold a 6 inch square. You stamp the first color, turn the paper 90 degrees, stamp the second color, then turn and stamp until you have done this four times. The pattern fills itself in. You can switch up colors as I did or do a monochromatic background.
I used the three challenge colors plus a grey. (I thought about heat embossing in silver for the fourth color but decided I wanted to practice first before I went a bit crazy!)
To finish off the card I dies cut some sprigs and used silver thread to "tie" them on.
Stamps: Concord & 9th Deck the Halls Turnabout
Dies: Stampin' Up! Pretty Pines
Thanks for visiting today! Click here to sign up for email notifications of future posts (you will be sent an email to verify your address - don't forget this step). Follow me on Instagram, Pinterest, Facebook and Bloglovin'.
10/25/2018
3-D Thursday Under the Sea Double Slider Surprise Card
Well, I couldn't make just one Double Slide Surprise card! Especially after my husband saw the card I made for Anushka. He shares the same birthday and of course was expecting something pretty special for his card.
My husband is a scuba diver (I am not) and loves the ocean. I am not particularly strong at swimming. That said, on our last trip to Maui we decided to take a snorkeling trip. It happened to be right before Hurricane Lane was coming by the islands and the sea was pretty rough. That, coupled with my lack of swimming ability, made for a rather tense snorkeling excursion for me. But my husband was great - he stayed by my side and actually held my hand the whole time I was in the water. Best snorkeling buddy ever!
So I went all out with his card using a dive theme. The background was created with Distress Oxide inks using wave a stencil for the sandy bottom. In order to cut all the pieces I did two rows of the background scene.
I then colored A LOT of fish pieces. Way more than I needed but it allowed me to play with placement and now I have extras.
I cut the center piece and the two side pieces roughly lining up the sandy bottom. You can see by this photo that I originally had the diver front and center but changed it to the submarine. I wanted to keep the diver as a "surprise."
I loved making Double Slider Surprise cards! There are so many possibilities with this format. But I will warn you - they are not quick to make. You need some thought and planning with them - so make them for someone special and take your time!!!
Dies: Lawn Fawn Double Slider Surprise
Stamps and Dies: All Lawn Fawn - Duh-Nuh, You Are Sublime, Fintastic Friends
Copics:
Distress Oxides: Tumbled Glass, Salty Ocean, Faded Jeans, Stormy Sky, Tea Dye, Antique Linen
Thanks for visiting today! Click here to sign up for email notifications of future posts (you will be sent an email to verify your address - don't forget this step). Follow me on Instagram, Pinterest, Facebook and Bloglovin'.
Subscribe to:
Posts (Atom)