2/23/2021

Wild About You

Hi everyone!  I'm a bit late with my post today but life got in the way this past weekend and there was barely enough time to make cards let alone write and schedule a blog post.  So this will be quick.

This card is for the sketch challenge at CAS Colours & Sketches.  It is Julie's last week this month and she gave us a fun sketch.
Recently, I've been remounting old wooden mount stamps as cling mount, and I had just done this set.  I thought the two pine trees would work great for the sketch, but it needed a bit more so I added the bear.

I would not have tried this layout before I remounted the stamps.  I used my MISTI so I could stamp the images a few times each.  I find solid stamps often don't stamp very well when stamped just once. I also was able to mask off the bear and then position the trees where I wanted by stamping on an acetate sheet.  I used the sheet to cover my bear panel and when the trees looked like they were where I wanted them I removed the sheet and stamped them on the actual card.

The sentiment is from another old set that I remounted.  You may be seeing a lot of "retro" cards soon!


Products used:

  • Stamps: Stampin' Up! Happy Camper; Wild About You
  • Ink: Mossy Meadow, Chocolate Chip
  • Cardstock / Paper: Very Vanilla, Echo Park patterned paper


Thanks for visiting today! Click here to sign up for email notifications of future posts (you will be sent an email to verify your address - don't forget this step).  Follow me on Instagram, Pinterest, Facebook and Bloglovin'


post signature

2/18/2021

Celebration Mice with Prismacolors

I'm the hostess this week at Tic Tac Toe Challenge.  I hope I've created a fun board for you all to play with.  I chose the left hand column down.


In looking for an image to color I came across this image which I had pre-stamped when I created another card.  In the interest of time and no waste, I colored it!  I used Copic markers to lay down an undercoat and used Prismacolors on top of that to give depth and shading.

Years ago, when I was studying art I learned that a layer of marker, dye or watercolor under colored pencil will allow you to use them without the telltale pencil marks.  The look of pencil is beautiful - if that is the look you want. If not, then apply a first layer of marker, dye or watercolor.  It can be shaded or a flat color and eliminates the white of the paper coming through the pencil strokes.  This is the technique I use for most of my pencil work.

I hope you will join us in the challenge this week!

Products used:

  • Stamps: MFT It's a Mice Time to Celebrate; Lawn Fawn Scripty Sayings
  • Dies: MFT Stitched Scalloped Edges
  • Paper: Queen & Co. Fruit Stand
  • Markers / Pencils: Sorry I didn't write them down (for pencils I usually go with what looks "right" at the time anyway!)

Thanks for visiting today! Click here to sign up for email notifications of future posts (you will be sent an email to verify your address - don't forget this step).  Follow me on Instagram, Pinterest, Facebook and Bloglovin'


post signature

2/16/2021

Two Color Challenges, One Card

Happy Tuesday! I'm combining my two color challenges into one post this week since I made very similar cards for each one. I like when I can economize on my time crafting and these are cards that are simple to make and look great.  

The first one I made is for CAS Colours & Sketches this week.  The colors are Gray Granite, Flirty Flaming and Misty Moonlight.  I wasn't quite sure what I wanted to do for the challenge but I'd just received these dies and hadn't used them yet so thought, "why not?".

The design is quite simple and I resisted the urge to add more flowers and some embellishments.  This is a "clean and simple" challenge!  Sometimes I have to keep repeating that to myself when creating.

I was so pleased with how it turned out I decided to make another in the challenge colors at Splitcoaststampers this week; Pear Pizzazz, Flirty Flamingo and Mango Melody.

I did change it up a bit by turning the orientation and adding more flowers / foliage and "bling."  The dessert this week is to use a stitched die cut.  Technically these are "pierced" blooms, not "stitched" blooms, but I'm calling it good!

I used a sentiment from Band Together.  That set has three great sentiments.  I'll probably keep it forever and my friends will get tired of seeing them!

Products used:

  • Stamps: Stampin' Up! Band Together
  • Dies: Stampin' Up! Curvy and Pierced Blooms
  • Ink: Gray Granite
  • Cardstock/Paper: Pear Pizzazz, Flirty Flamingo, Misty Moonlight, Mango Melody, Whisper White, Neutrals DSP
  • Accessories: Rhinestones

Thanks for visiting today! Click here to sign up for email notifications of future posts (you will be sent an email to verify your address - don't forget this step).  Follow me on Instagram, Pinterest, Facebook and Bloglovin'


post signature

2/14/2021

Happy Valentine's Day

Happy Valentine's Day.  I normally don't post on Sunday, but I have a few cards that I didn't get posted this week.

First up, Splitcoaststampers had a fun challenge to use the first stamp you ever purchased.  This isn't the first individual stamp, but it is from the first stamp set I bought.

"Voila" from Stampin' Up!.  I loved it way back when and I still love it now.  It's been sitting on the shelf, mounted on wood and unused for awhile.  I've become addicted to using my stamping platforms to get good images and rarely will I use a wood mount stamp.  But I do like the look and feel of them so it is sometimes hard to take them off the blocks.  I finally unmounted this set and the set "Loads of Love".  I know I'll actually start using them again now.

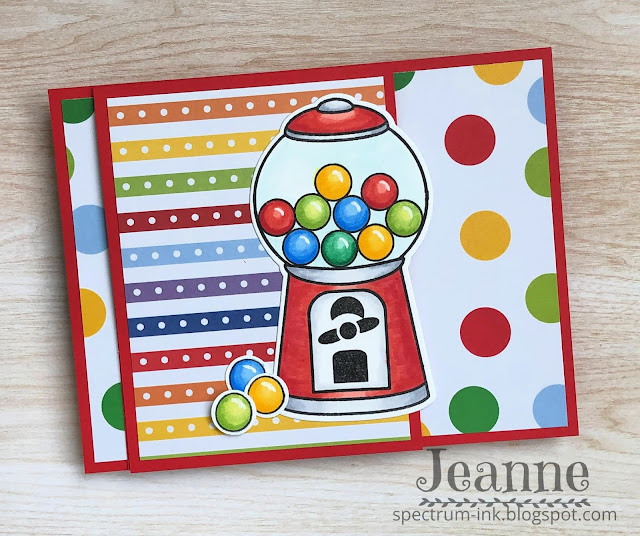
My second card is for the sketch challenge at Splitcoaststampers.  It's a super easy fun fold card.  I used the "Bubblegum4me" stamps and die from The Stamps of Life along with some of their paper.  It makes a fun, bright birthday card.

Well, that's it for this Sunday!  Have a wonderful Valentine's Day!

Thanks for visiting today! Click here to sign up for email notifications of future posts (you will be sent an email to verify your address - don't forget this step).  Follow me on Instagram, Pinterest, Facebook and Bloglovin'

post signature

2/09/2021

Hey Girlfriend

Happy Tuesday!  Time for a sketch challenge at CAS Colours & Sketches.  Julie gave us a fun sketch this week and I decided to make a Valentine card.  

Here is the sketch:

I was not super impressed with this stamp set in Stampin' Up!'s new spring mini catalog and had no intention of purchasing.  After seeing cards that were made with the images I became intrigued by the skirt on this girl and I really like the hands heart.  It grew on me.  So with my last order I ordered this with Hostess dollars.  (That's not even real money is it?  LOL!)

I'm so please with how this turned out.  I used markers and Prismacolors to color it.  This reminded me quite a bit of Stamping Bella images and those images are at the top of my "fun to color" list!

I'm now excited to color the other images in the set.  And as bonus that I did not see until I got this in my hands - the dog is from the retired Bella and Friends and the cat matches Pretty Kitty!

Products used:

  • Stamps: Stampin' Up! Hey Girlfriend
  • Dies: Well Written, Layer Ovals, Be Mine
  • Markers: Copics - N0, N1, N2, N3, E34, E39, E29, BG0000, R30, RV52; Stampin' Blends - Flirty Flamingo, Lovely Lipstick; Spectrum Noir Tri-Blends Fair Skin, Tan
  • Accessories: Subtle Embossing Folder

Thanks for visiting today! Click here to sign up for email notifications of future posts (you will be sent an email to verify your address - don't forget this step).  Follow me on Instagram, Pinterest, Facebook and Bloglovin'
post signature

2/08/2021

Laurel Burch Butterflies Color Challenge Card

Good evening!  I'm super excited to be the hostess this week for Splitcoaststampers Color Challenge!  I did a bit of alliteration this week and chose Blueberry Bushel, Bumble Bee and Bermuda Bay.  For the added dessert I asked for another "B" color.

My card uses a Laurel Burch artwork stamp from Stampendous.  Do you remember her art from the 80s and 90s?  (Am I showing my age?)  I have always loved her use of color and the bold, graphic nature of the designs.  So when I saw some of the images made into stamps a few years ago, I bought several.  I'm happy I did as I couldn't find any on the Stampendous website now.

I decided that for the bold colors I chose - and I added Berry Burst for my dessert - her images would be perfect.  I used markers to color match to the challenge colors and then used the reinkers to create a wash for the background.

I was torn between these butterflies and a couple of other images, but I thought I might need a few more colors on the other images I considered.  I've set them aside and hope to get to them soon.

These butterflies were fun to color and have dies to match but the dies only cut the wings / body; not the antennae.  And they do not cut with a white outline but on the stamped line.  To make the cut image clean I went around the edge with a black marker so any slight bit of white was covered up.  I used a multi-liner pen to hand draw the antennae.  I popped up the one overlapping butterfly using foam dots.

The markers I used were a combination of Copics and Spectrum Noir Tr-Blends.  I just purchased a few and am trying them out.  They are very similar to the original Stampin' Up alcohol markers with a light, medium, and dark tone, but these are all in one marker.  They nest in one another so you really have three short markers.  Since they only have one nib per color, you have to choose if you want to purchase the bullet nib or brush versions.  I purchased the bullet since my Copic have brush tips and on some stamps those are just too big.  These also fill in a few "holes" in the Copic colors but most of the colors I purchased were very close to Copic colors.  On the plus side they seem to blend just as nicely as Copics.   So far, I like them, but I'll keep you advised as I try them out a bit more.

I hope you will join us in the challenge this week!

Products used:

  • Stamps and Dies: Stampendous Laurel Burch
  • Stamps: Stampin' Up! Butterfly Basics
  • Markers: Spectrum Noir Tri-Blends - True Blue Blends, True Blue Shades, Turquoise Green; Copic markers - RV63, RV66, Y21, Y26
  • Ink: Stampin' Up! Berry Burst, Bermuda Bay, Blueberry BUshel
  • Paper: Whisper White, Strathmore Mixed Media

Thanks for visiting today! Click here to sign up for email notifications of future posts (you will be sent an email to verify your address - don't forget this step).  Follow me on Instagram, Pinterest, Facebook and Bloglovin'

post signature

2/04/2021

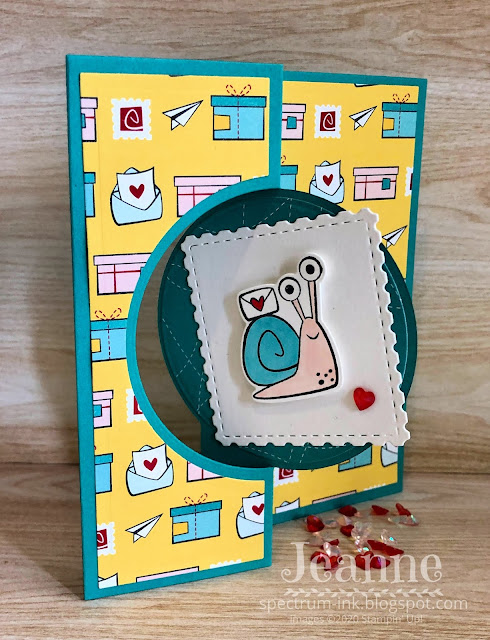
Snailed It Flip-It Card

Super cute, super fun and super easy.  Does it get any better than that!?!  It took me longer to agonize over what paper to use than to make this card.  But I am so happy with the results.

This card was created for the Team O Tic Tac Toe Challenge this week.  I chose the lower left to upper right diagonal - fun fold, circle/oval and bugs (technically, a snail is not an insect but I'm calling it a bug!)

Since I used a die to create this card it went really fast.  I LOVE the interactive dies from The Stamps of Life.  They make creating cards like this flip card SO easy.  I just had to choose the paper and follow the instructions.

I did do a little coloring of the snail, but because the images on the paper are graphic and flat I didn't want to add shading to my main little guy.  I did my best to keep him flat and I think came out just fine.

This card will be a Valentine from my daughter to her boyfriend, but it could be used for any number of occasions.

 Products used:

  • Stamp and die: Stampin' Up Snailed it 
  • Die: The Stamps of Life Circle Flip-It
  • Paper: Stampin' Up! Snailed It
  • Copic Markers: BG45, R00, R29 (I have never published a marker list so short!)

Thanks for visiting today! Click here to sign up for email notifications of future posts (you will be sent an email to verify your address - don't forget this step).  Follow me on Instagram, Pinterest, Facebook and Bloglovin'


post signature

2/03/2021

Love Bandit

I'm so excited!  I was asked to be a Guest Designer for the next six months for the sketch challenge at Splitcoaststampers!  Today is my first week.  My card features an old stamp set but one that I hadn't used.  I actually purchased it second hand - I thought the images were so cute and my style.

Below is the sketch this week:

This card is pretty straightforward.  The only tricky part was masking off the  sentiment and image as I wanted to stamp them separately and they are on one stamp.

Products used:

  • Stamps: Stampin' Up! Love Bandit
  • Dies: MFT Stitched Frames, Stitched Rectangles
  • Markers: Copic markers - C1, C3, C5, R29
  • Cardstock / Paper: Whisper White, Smoky Slate,  Smoky Skate retired DSP
  • Accessories: Heart Punch

Thanks for visiting today! Click here to sign up for email notifications of future posts (you will be sent an email to verify your address - don't forget this step).  Follow me on Instagram, Pinterest, Facebook and Bloglovin'


post signature

2/02/2021

Peeking Pals

I'm a bit late to the show with this week's card for the CAS Colours & Sketches color challenge.  I got so busy that I forgot to take a photo of my card!  And I only take pictures at a certain time of day because of the natural light.  When I remembered it was too late.

Julie did challenge me  this week.  I just could not decide what to do and had very few ideas.  My first one went down in flames.  I had just received these dies in the mail and fully intended to use them on one card.  So I thought, why not make the backgrounds the challenge colors?

I originally blended the backgrounds from dark to light, but the solid really made the animals pop so I went that direction.  The sentiment is one from a pre-printed sentiment set at Simon Says Stamp.   They make it super easy.

Thanks for stopping by today.  I hope you will find time to join us at CC&S this week!

Products used:

  • Dies: Simon Says Stamp Peeking Cat, Peeking Dog, Peeking Frog; MFT Stitched Rectangles
  • Cardstock: Poppy Parade, Pacific Point, Just Jade
  • Accessories: Simon Says Stamp Sentiment Strips

Thanks for visiting today! Click here to sign up for email notifications of future posts (you will be sent an email to verify your address - don't forget this step).  Follow me on Instagram, Pinterest, Facebook and Bloglovin'


post signature

2/01/2021

Valentine Ladder Shaker

Ever have one of those cards that seems to take WAY more time than it should?  My card this evening is one of those.  It’s for the color challenge (Petal Pink, Poppy Parade and White) at Splitcoaststampers so the color choices were fixed.  First I couldn’t decide on the stamp set.  My first thought was the new set Mini Meows from My Favorite Things but I had at least 4 other sets on my desk that I looked at, thought about, and played around with.  And I finally ended up using Mini Meows.  Sigh.

Then it was design.  Again, I just couldn’t come up with what I wanted.  As I do when I need inspiration I checked out the MFT website and Pinterest.  I saw a similar design and coloring of the cats so I used those as my starting point.  I hit on making this a shaker card, that's where everything clicked and from there the process went fairly quickly (at least as fast as a shaker card can go.)

My cats are colored very simply.  I really love detailed coloring but every so often (and it’s happening more lately) I find that simple or flat coloring is what the card needs.  Here was one such occasion.

Engineering this card took some time.  I call this a “ladder shaker” because I wanted three individual shakers not one large one.  I cut a second “ladder” and glued my background squares behind it. 
I glued that to the card and attached my foam.  I had to be very careful to make sure there were no gaps. 
After that it was simple.  I guessed about right on the amount of shaker elements.  This can be the toughest decision in shakers because once you’ve attached the top there is no going back.  I try to err on the side of too much because too little isn’t much fun.  I wish I had a formula for you, but my basic method is “eyeball it!”

This card will be going to my youngest daughter for Valentine’s Day.
 
This is also for the NBUS challenge this month.  My Never-Been-Used-Schtuff? The Mini Meows stampset (just arrived!) and the Photo Booth Strip (had for ages).


Products used:
  • Stamps and dies: MFT Mini Meows
  • Dies: MFT Photo Booth Strip, MFT Basic Stitched Edges 2
  • Markers: Copic W1, Stampin’ Blend Petal Pink Light
  • Card stock / Paper: Whisper White, Subtles DSP (retired)
  • Accessories: Stampin’ Up! From My Heart Faceted Gems

Thanks for visiting today! Click here to sign up for email notifications of future posts (you will be sent an email to verify your address - don't forget this step).  Follow me on Instagram, Pinterest, Facebook and Bloglovin'
post signature