Here is the challenge that was posted:
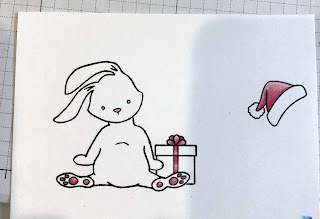
I got part way though coloring this card when I realized I had made a fairly obvious error in my layout. The bunny and the gift are two stamps so the image needed some masking. I stamped the bunny first (since he's in front), masked him off and then stamped the gift. Easy.
See the issue - it wasn't until I went to color the package that I realized that the gift should be behind his foot but IN FRONT of his hand. Since I had to restamp, I could have just moved the gift up behind his hand only, but I really wanted it between his hand and foot. I needed to mask and stamp this in stages; only part of the image at a time. I own both size Mistis and a Stamparatus - I use them all for different things. For this layered masking, the Stamparatus helped enormously!
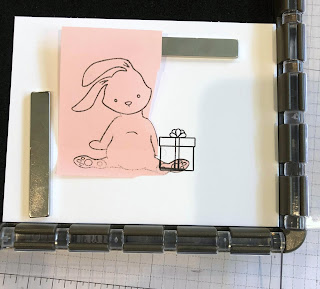
The Stamparatus allows you to use multiple plates as they pop off the base quite easily. And you can have two plates on the base at one time.
I put the bunny stamp on my bottom plate. Using a small ink cube I carefully inked up just his foot and stamped that.
Using a Post-It note I created a bunny mask and cut off his hand so I would get the full gift behind the foot. The gift was on the right hand plate. My bunny was kept on the bottom plate.
Then I created a mask of the gift...
and I restamped my bunny using the stamp that was still on the bottom plate.
I mask images quite a bit but most of the time I'm not trying to insert one image into the middle of another. It's good to know that it can be done. I could have done this with my two Mistis by moving the image from one to the other, but the Stamparatus made it super simple since I could leave the image in the platform. I have had it happen that I take an image out of my stamping platform, decide it needs to be restamped and I don't put it back in quite all the way. Less than a millimeter off can ruin an image. This kept things very accurate.
Multi-layer masking is actually quite easy, it just requires a bit of pre-planning and visualizing!
Stamps: Honey Bee Stamps Blah Humbunny
Dies: Honey Bee dies to match; Cottage Cutz Stitched Squares and Scalloped Squares
Copic markers: RV11, RV32, RV34, B0000, B21, B23 N0, N1, W00, W1, B91, B93, B95, B97
Accessories: Stampin' Up! Stamparatus
Thanks for visiting today! Click here to sign up for email notifications of future posts (you will be sent an email to verify your address - don't forget this step). Follow me on Instagram, Pinterest, Facebook and Bloglovin'.


Beautifully masked and stamped and coloured Jeanne. I feel quite dizzy reading about it but I'm sure it was much easier to actually do it! Vicky x
ReplyDeleteYou did an amazing job creating texture and shadow with your coloring! The trim on the hat is fantastic!
ReplyDeleteWhat a great explanation Jeanne on how to create the perfect masked object; worth the time to get it right, it looks fab!
ReplyDeleteYour masking stamping is perfect!!! I thought it was a single stamp before I read this posting. And Nice colouring, as always.
ReplyDelete