11/30/2020

Gnome for the Holidays Box Card

Thanksgiving came late this year and now we're already in the home stretch for Christmas.  Whew.  I still have some Christmas cards to make.  One nice thing about being on design teams - by this time I have a lot of Christmas cards but no two are alike.  That's okay.  Last year everyone's cards were different and this year may be the same.


Tonight's card is for this week's color challenge at Splitcoaststampers.  When picking the December colors LeAnn beat me to it and picked the EXACT colors I was going to pick.  I feel like I got a bonus.  Now there are two challenges where I love the colors!

This year I'm trying to actually use the stamps I purchase. It's a little like bailing out the Titanic with a teacup, but I am trying.  This gnome set has been sitting on the shelf.  So I pulled it out and colored 'em up!

I used Stampin' Blends and color matched the Gorgeous Grape with Copic markers.  No fussy cutting on these.  I used my Scan 'n Cut.  I call it the Kitchen Aid mixer of my craft room because like my mixer it takes longer to set up than actually use, but boy I would not want to live without it.  I'm looking forward to the day when I have an actual craft ROOM - not area - and can leave it set up.  Watch out world!


I recently purchased these Outside the Box dies from My Favorite Things and thought that the gnomes would make the perfect addition.  And how cute are they in this scene? 

If you've enjoyed my card this evening please sign up for email notifications of future posts!  See below.

Products used:

  • Stamps: Stampin' Up Gnome for the Holidays
  • Dies: My Favorite Things Outside the Box Level Up and Outside the Box Snowdrifts, The Stamps of Life extras4snowglobe
  • Paper/Cardstock: Balmy Blue, Whisper White, Snowflake Splendor, Dazzling Diamonds
  • Ink: Balmy Blue, Memento Black
  • Markers: Stampin Blends - Highland Heather light & dark, Balmy Blue light & dark;  Copic markers V000, B0000, V01, V12, V15, V17, E00, E11, N0, N1, N2, N3

Thanks for visiting today! Click here to sign up for email notifications of future posts (you will be sent an email to verify your address - don't forget this step).  Follow me on Instagram, Pinterest, Facebook and Bloglovin'

post signature

11/27/2020

Who's Watching Who Safari Card

I hope you had a wonderful Thanksgiving even if you couldn't be with friends and family this year.  We had a virtual get together instead of the usual 20+ people we normally have at our house.  I'm already planning on a big party for next year!

And now to my card for today.

This adorable gang is out looking for you on their people photo safari!  The die is part of the new release of Safari themed dies from Cottage Cutz and they are so sweet!

I thought they would be great for a stand-up card.  I know many of my friends display this kind of card long after their birthday or they get well (they are perfect for bedside get well cards); these critters are too cute to put away!

I kept this card in neutral colors and greens.   I thought about embossing the background with a woven embossing folder but ultimately decided upon this woven look paper.  To anchor it I used a green linen thread.  And I couldn't leave the sky behind them blank so I stenciled some clouds.

The critters are colored with blending brushes and Distress Oxide inks.  The edges are shaded with sponge daubers.  I used two colors - Antique Linen over Wild Honey - to get the more golden tone for the lion.  I love how the oxides can blend like that with a lighter tone over a darker one.  The leaves are in Stampin' Up! inks and I colored the camera and binoculars with Copic markers.  All are listed below.

This whole release is ADORABLE and it's on sale right now for Black Friday.  Check out the CottageBlog for samples of this release made by me and other members of the design team!

Products used:

  • Dies: Cottage Cutz Safari Adventure Gang and Safari Phrases
  • Stand Up Card die: The Stamps of Life 
  • Paper/Cardstock: Whisper White, Soft Suede, Park Lane DSP (retired)
  • Ink: Distress Oxides Antique Linen, Hickory Smoke, Vintage Photo, Walnut Stain, Ground Espresso, Wild Honey
  • Ink: Stampin' Up! Pear Pizzazz, Old Olive, Mossy Meadow
  • Accessories: Mossy Meadow woven linen thread


Thanks for visiting today! Click here to sign up for email notifications of future posts (you will be sent an email to verify your address - don't forget this step).  Follow me on Instagram, Pinterest, Facebook and Bloglovin'


post signature

11/24/2020

Happy Hour CAS Card

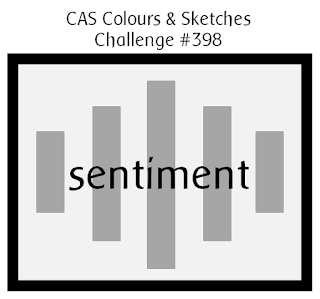
Happy Tuesday - it's hump day this week!  And time for another challenge at CAS Colours & Sketches.  This week we have a sketch challenge.

Here is the sketch:


This card is one that looks so simple and is, but isn't.  Often, the simpler the card the more time it takes to create.  That's because everything needs to be just right.  There was a lot of measuring and light pencil lines to get everything here to line up.

When I first started making cards, if something went wrong I was told "it's an embellishment opportunity."  And for many cards that is correct and works beautifully.  However with a CAS card there are no embellishment opportunities.  If you have to add a layer or a banner or a flower, chances are it's no longer CAS!

I've had this stamp set since 2012 or 2013.  I loved it but could never get it to look how I wanted. First, it was wood mount and second, it was not two-step stamping.  The liquid was not a separate stamp from the glass and I always wanted the glass outlined in a different color.  I tried using  a Stamp-a-ma-jig with the wood stamps to line things up but that didn't work well.  I had this ready to be listed on eBay.  And then....

I got a stamping platform and I learned how to remount wood stamps as cling mount!

For this card I used my Stamparatus and stamped each glass twice.  First I colored just the liquid using Stampin Write markers (do not use alcohol markers) and then I stamped again after coloring the outline with a black marker.  And it worked this time!  I'm so happy I kept this set.  I love how this came out.  I even got a little bit of the Tequila Sunrise feel with a few marker colors in the hurricane glass.

I'll be using this set more often now that it's simpler to use.

Products used:

  • Stamps: Stampin' Up! Happy Hour
  • Ink: Memento Tuxedo Black, Versafine Black Onxy (sentiment)
  • Markers: Daffodil Delight, Mango Melody, Pumpkin Pie, Melon Mambo, Lemon Lime Twist, Crumb Cake

Thanks for visiting today! Click here to sign up for email notifications of future posts (you will be sent an email to verify your address - don't forget this step).  Follow me on Instagram, Pinterest, Facebook and Bloglovin'


post signature

11/23/2020

Lots of Love at Christmas

My card this evening features the colors for this week's color challenge at Splitcoaststampers.  Karen gave us classic Christmas colors - Poppy Parade, Shaded Spruce and Pool Party - with "cute" for dessert.


Well, I'm all about the cute - I love making  cute cards.  This adorable Snowman and Reindeer die is from Cottage Cutz.  If you have never used a Cottage Cutz die, they are very simple to use.  Rather than cutting all the pieces individually, the die is one piece and cuts out all pieces with one pass through your die cutter.

Sometimes I will use up scrap and cut out of multiple colors but for this card I cut all the pieces from white cardstock and used Stampin Blends and ink to color the pieces.  It went very quickly.

I used a sponge dauber on the edges of the snow banks and snowman and blending brushes for the solid colors.  I love how you can get shading on your die cut pieces when doing this!

I hope you've enjoyed my card tonight!

Products used:

  • Dies: Cottage Cutz, Snowman and Reindeer, Cottage Cutz Stitched Circles, MFT Stitched Curves
  • Stamps: Stampin' Up! Itty Bitty Christmas
  • Inks: Stampin' Up! Poppy Parade, Shaded Spruce, Pool Party, Memento Black, Distress Oxide Vintage Photo and Walnut
  • Markers: Stampin Blends - Poppy Parade (berries & heart), Shaded Spruce (holly), Mango Melody (nose) Copic Markers - Black

Thanks for visiting today! Click here to sign up for email notifications of future posts (you will be sent an email to verify your address - don't forget this step).  Follow me on Instagram, Pinterest, Facebook and Bloglovin'


post signature

11/19/2020

Warm Hugs

It's another Team O challenge at TicTacToe Challenge blog and I have the pleasure of being the board designer this week!  A funny thing about being the board designer - that makes it harder to create a card.  When someone else tell me the parameters I have to use I'm okay, but boy is it indecision time when I make the parameters!  So this week I actually made TWO cards!


Here is my board:

My top card uses the middle row across and the bottom card uses the right hand column.

I had fun making these but I knew I was in trouble when it seemed I had everything in my craft room on my desk while creating. That's when I know it will take forever and I'll have trouble making decisions.

However, my silver lining was that I created two cards that I really like!  I used the top one as my design team card because my coloring on the bottom one could be a bit smoother.  I may go back and try to even it out.

To be fair though, very often what appears smooth (or at least smooth-ish) to the naked eye does not look quite as smooth in a photo. Kind of like when you see yourself in a photo or on Zoom and think - do I REALLY have that many wrinkles!?!

I tried to give the feel of a sweater to both cards - one through the use of the stencil and the other with the embossing folder and the stitched edge.  I used my Scan 'n Cut on this image which allowed me to stamp the steam above the cup then cut it and the bear out as one.

I hope you enjoyed the cards today.  I love this set from My Favorite Things.  I can't wait to color some of the other critters! 

Products used:

  • Stamps: My Favorite Things Sweater Weather in the Woods
  • Dies: Stampin' Up! Coffee Cups, SU Stitched Rectangles, MFT Homespun Stitched Lines
  • Accessories: SU Greenery and Subtle Embossing Folders, SU Stencil, enamel dots, linen thread, wood wreath, Scan 'n Cut
  • Inks: Distress Oxide Vinatge Photo, Rusty Hinge, Antique Linen, Hickory Smoke
  • Markers: Stampin Blends - So Saffron, Daffodil Delight, Pumpkin Pie, Old Olive, Mossy Meadow, Copic markers - YR30, YR000, YG21, E99, Y0000, E41, E43, E44, E47, R01
Thanks for visiting today! Click here to sign up for email notifications of future posts (you will be sent an email to verify your address - don't forget this step).  Follow me on Instagram, Pinterest, Facebook and Bloglovin'


post signature

11/17/2020

Mixed-Up Koala

I have a fun card today for this week's color challenge at CAS Colours & Sketches.  It uses the stamps and dies from Stampin' Up!'s Menagerie Mix-Up bundle.

The colors:

This fun set lets you create numerous animals by swapping out ears. noses, heads, bodies, tails and even antlers.  You can either create an animal through masking and stamping, or to make it super simple, you can cut out various the body parts and then assemble them as I've done here!

Some of the animals you can create are:

  • mouse
  • lamb
  • deer
  • bear
  • koala
  • beaver
  • pig
  • cow
  • bunny
  • cat

I can't wait to have a bit of free time to stamp and play with the different elements.  The set also comes with extras like the hat seen here, a scarf, balloon, heart, etc. so your critters can hold things or be dressed for the event!  A super fun set for all occasions!


If you love animals (or know someone who does) now is the time to order.  This set is in the Holiday catalog and may not be available after December 31.  The critters holding hearts are PERFECT for Valentine's Day!


Place ANY order with me between now and November 30 and use Hostess code 7N6PTXRA and I will send you a copy of the upcoming January-June Mini Catalog.

If your order is $150 or more DO NOT use the code and YOU will receive the Hostess Benefits!  I will still send you the catalog!


Products used:

Thanks for visiting today! Click here to sign up for email notifications of future posts (you will be sent an email to verify your address - don't forget this step).  Follow me on Instagram, Pinterest, Facebook and Bloglovin'


post signature


11/16/2020

Sweets and Gingerbread

I'm the hostess this week at Splitcoaststampers Color Challenge.  My colors are Real Red, Cinnamon Cider and Purple Posy with Gingerbread for dessert.

This card is a bit out of my style and was a little challenging to make.  At one point I asked myself what was I thinking when I chose those colors?!?  I had ideas but they didn't involve a lavender and a red!

In the end, I was really happy with how this turned out.  It certainly says gingerbread to me.  I used a lace edge punch that I have had for YEARS and never used.  It along with the embossed panel creates a great lacy background for my little men.

To get enough "sugar" on the card I used Versamark ink and Heat 'n Stick Powder along with Dazzling Diamonds glitter to cover the peppermints and candy canes.  I tried it on the greenery as well, but that was just too much - LOL!

I'm not much of a bow tie-er so that was interesting.  Not sure how I got such a nice looking one but after a few tries I ended up really liking how it came out.

This is one of those cards that took a long time to put together; probably because it was so different for me.  It just goes to show you that sometimes stepping out of your comfort zone has it's rewards!

Products used: (all Stampin' Up! unless otherwise stated; most are retired)

  • Stamps: Stampin' Up! Scensational Seasons, Candy Cane Christmas, Itty Bitty Christmas
  • Dies: Holiday, Poinsettia, Ornate Frames, MFT Circle Stax 1
  • Ink: Real Red, Purple Posy, Cinnamon Cider, Versamark
  • Accessories: Heat 'n Stick powder, Dazzling Diamonds glitter, pearls, Stylish Scrolls Embossing Folder,  Red Glitter paper, Martha Stewart lace edge border punch

Thanks for visiting today! Click here to sign up for email notifications of future posts (you will be sent an email to verify your address - don't forget this step).  Follow me on Instagram, Pinterest, Facebook and Bloglovin'

post signature


11/10/2020

Have a Hoot Christmas

We have a new sketch at CAS Colours & Sketches this week!  It gave me a chance to work with a stamp set that I've had for a few months and never used.  Since half of the stamps are for Halloween and half for Christmas, so I'm happy I could get it out before one of the holidays.  I hate when I get a stamp and have to wait until next year before making a card with it!  (I'm sure that never happens to anyone else.....)

The sketch:


For my card, I stamped my image then masked off the moon behind the owl. I used sponges with Misty Moonlight and Night of Navy inks to create a blended sky.  After I removed the mask I colored the image using Stampin' Blends.  The coloring on this is very basic with shading only on the owl. The other parts of the image are too small; I used the dark marker of each set on them.  The circle was cut with a 1 3/4 inch punch.

The foliage is from the Christmas Layers die set.  This is a set introduced last year in the Holiday catalog and one I feel is overlooked.  It has three beautiful background accent dies that make for lovely additions!

And of course, for my second circle I added my favorite embellishment - a gold hoop! Since you can see all the way around this one I couldn't use glue dots to hold it down.  Instead, I placed it on an adhesive sheet, pressed it in, and then lifted it off.  This made the back side sticky.

I hope you've enjoyed this card today.  This set makes cute and quick Christmas cards!


Place ANY order with me between now and November 30 and use Hostess code 7N6PTXRA and I will send you a copy of the upcoming January-June Mini Catalog.

If your order is $150 or more DO NOT use the code and YOU will receive the Hostess Benefits!  I will still send you the catalog!


Products used:

Thanks for visiting today! Click here to sign up for email notifications of future posts (you will be sent an email to verify your address - don't forget this step).  Follow me on Instagram, Pinterest, Facebook and Bloglovin'


post signature

11/09/2020

Spring Mini Catalog Sneek Peak

This past weekend I attended OnStage at Home and got a chance to preview upcoming Stmapin' Up! products and even use one!  The Dragon Fly Garden bundle will be offered and it features some lovely images and a very cool dragonfly punch!


 I'm getting more into punches these days.  I love die-cutting but sometimes I just feel that using a punch is faster and easier.

I also used several current products on this card - Very Versailles stamp, Forever Flourishing dies, Stitched Rectangle dies, linen thread, Wink of Stella and rhinestones.

This card is for  the color challenge at Splitcoaststampers this week and I needed to use Misty Moonlight, Mint Macaron, Calypso Coral and my favorite yellow (Bumblebee for this card.) You can see the mint in the dragonfly wings which I colored using sponge daubers and ink.  I managed to get in my Calypso Coral by coloring a few rhinestones with the CC Stampin' Blend marker.  Sometimes you need to be creative in a color challenge!

The new Spring Mini has some GORGEOUS stamps and dies along with many cute and fun ones!  There are also some very innovative and exciting accessories too.


Place ANY order with me between now and November 30 and use Hostess code 7N6PTXRA and I will send you a copy of the upcoming January-June Mini Catalog.

If your order is $150 or more DO NOT use the code and YOU will receive the Hostess Benefits!  I will still send you the catalog!


Products used:


Thanks for visiting today! Click here to sign up for email notifications of future posts (you will be sent an email to verify your address - don't forget this step).  Follow me on Instagram, Pinterest, Facebook and Bloglovin'


post signature

11/05/2020

Dove of Peace

It's another challenge for Team O at Tic Tac Toe Challenge. This week's challenge gave us some great choices - so many that I had a hard time deciding what to make.

I finally decided on the right column down.

And this card was so easy to make that I made another similar card.  I plan on making a few more using this general them of white on white with the sentiment in a foil or color.

It's a very classic and elegant look.


My main dies are Detailed Doves and Joy.  I varied the look with embossing folders and a returning die from last year Christmas Layers.
Once I had the card designed the assembly went very fast making these good choices for making multiple cards.  I used adhesive sheets on the foil so the sentiments were easy to place.  And although they are layered they are still fairly flat and light for easy mailing.

Place ANY order with me between now and November 30 and use Hostess code 7N6PTXRA and I will send you a copy of the upcoming January-June Mini Catalog!

If your order is $150 or more DO NOT use the code and YOU will receive the Hostess Benefits!  I will still send you the catalog!


Products used:

Thanks for visiting today! Click here to sign up for email notifications of future posts (you will be sent an email to verify your address - don't forget this step).  Follow me on Instagram, Pinterest, Facebook and Bloglovin'


post signature

11/03/2020

Sunflower Autumn

Today we welcome Shannon as our hostess for November at CAS Colours & Sketches.  She has given us some beautiful fall colors to work with so I just had to create another autumn card even though I need to start on my Christmas cards!

Here are the colors:


Celebrate Sunflowers is a bundle that is fast becoming a favorite.  I was first attracted to it by the dies (they are gorgeous!) but the images are wonderful as well.  This is the smaller of the images and works perfectly for a CAS card.

Using my Stamapratus I stamped the image on Whisper White Thick cardstock in Saddle Brown Stazon ink and did not remove the stamp.  I then "watercolored" the image using the ink colors and a blender pen.  Although the Stazon does not bleed or blend with water it did loose it's color a bit with the other inks on top.  So I reloaded my image in the Stamapratus and stamped it again.  This gave me the rich, vibrant brown I was looking for.

I stamped my sentiment on the card base, used a stitched square to cut out the flower and popped it up using foam dimensionals with just a bit of linen thread underneath.  A super easy card that would be perfect to send to friends this Thanksgiving!


Place ANY order with me between now and November 30 and use Hostess code 7N6PTXRA and I will send you a copy of the upcoming January-June Mini Catalog!

If your order is $150 or more DO NOT use the code and YOU will receive the Hostess Benefits!  I will still send you the catalog!


Products used:

Thanks for visiting today! Click here to sign up for email notifications of future posts (you will be sent an email to verify your address - don't forget this step).  Follow me on Instagram, Pinterest, Facebook and Bloglovin'


post signature