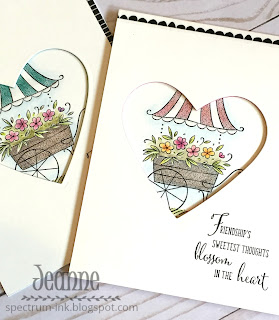
Hi everyone! Today I'm sharing another card using the stamp set Friendship's Sweetest Thoughts and watercolor pencils. Have I mentioned how much I love this set?
The style of it is perfect for watercolor. When choosing how to color an image giving some thought to the natural style of the art is important. I love using alcohol markers, and they can be used loosely, but my style of coloring with them is much more controlled and precise - probably not the best way to color the images in this stamp set. For me, this set calls for a loose, quick style and watercolor is a good fit.When coloring this image I opted to use a blender pen and Shimmery white card stock as opposed to a brush, water and mixed media or watercolor paper. To get the shadows in the cart top I shaded it in the middle by pressing heavier with my color and also adding some grey pencil. You can see I also added a little grey to shade the ruffle trim. When using blender pen to mix two colors it's best to go from the lighter into the darker shade/color. This keeps the darker shade where it should be. If you pull the dark into the lighter shade sometimes you end up with not much color where you want it dark and all your color where you want it light!
To get the background sky use a very light touch with the pencil just next to the image and then use the blender pen to soften it out. The same with the foliage between the flowers. I used a light touch with my green pencil and even added a little brown near the cart for depth. When I blended it out with the pen it gave it a nice soft feel and depth.
I decided to highlight the cart with a heart shape window based on the sentiment. I could have used dimensional foam dots or tape to pop the front off of the back of the card base, but I wanted to add a little something extra. So I cut three pieces of Bermuda Bay the same size as the front and using the top panel as a template I die cut a heart in each of the colored pieces and glued them together. For my card with the pink topped cart I used Flirty Flamingo.
I used a bit of washi tape to accent the card front and then adhered it to the colored stack. I did need to take scissors and hand trim a bit off of some sides. When doing this technique it is more important to get the window lined up rather than the outside of the card!
The stacked card stock gives a very pretty little bit of color to the shaped window.
Here are the supplies I used. (Please use Hostess code 2BQK2KJZ when placing an order. If you order $150 of products-before tax and shipping-do not use the code so YOU get the hostess benefits.)
Stamps - Stampin' Up! Friendship's Sweetest Thoughts
Stampin' Up! Watercolor Pencils
Stampin' Up! Blender Pens
Sweet and Sassy Heart Framelits
Pick a Pattern Washi Tape
Shimmery White Card Stock
Bermuda Bay Card Stock, Flirty Flamingo Card Stock
Basic Black Archival Ink
Thanks for visiting today! Follow me on Facebook, Pinterest and Instagram. Click here to sign up for email notifications of future posts!


No comments:
Post a Comment